Pages

Tuesday, 23 July 2013

More Painting and Decor Works on The Fairy's Nook!

Hello my dear friends,

I hope you are all well and are enjoying your summer. Well here in Malta is pretty much the same; getting hotter and hotter! Today I want to welcome three new followers to my Blog; Melanie, Ana Correia and Sans DD. Welcome!

I have been really busy with the Fairy's Nook. Even if it is a very small project it still takes it's time. I don't mind it one bit. I don't like rushing them anyway. The only things that I get desperate to finish are the tough pieces or mostly the parts which keep me awake during the night.

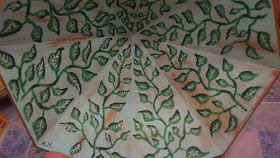
In these past two weeks I have managed to finish mostly the roof. This property has a lift off roof to see inside so basically the roof has to have a wow factor on both the interior and the exterior. The interior was a head ache which I over came in a couple of hours. At first I wanted to give it just a one plain color with some shading and shadows but it looked very empty and plain compared to the interior walls. Then I decided to paint it with leaves. So once again my acrylic paints and paint brushes came out. I painted the whole ceiling with climbing leaves. It took me hours to finish but at the end it was all worth it. 

The Painted Ceiling that I did


Inside the room
 Then I started working on the roof. I knew from the beginning of this project how I wanted the roof. I think it was the first thing that was really clear in my imaginative picture. I got myself some leaf garland the cheapest that I found. 99p for a garland with free postage. I cut out the leaves and tiled it to the roof. I think it is the cheapest roof covering that I ever made. In  this small project even if it is a 12th scale I wanted it to be built in the full life scale. I wanted to bring out this little fairy house to our real world. So the full sized leaves where just perfect.

The roof covered in full scale leaves


After that I started working on the lower grounds of this project which is practically under this one room. I have a clear picture of what I want only that I won't be saying anything before I actually believe that it is possible. Once again another headache to tackle. I have used another piece mdf wood cut in a circle and glued it to the base. I have used poly-fill to bring out the effect of a tree stump. Then I used paper and glue to make the rocks or uneven grounds around. So far I was pleased with the out come. Then my paint brushed and acrylic paint came back out. I have painted the whole base in different shades of brown and green. I tried to bring out the wood land effect.

The building of the base

The Tree Stump and roots
Painting the base


I am quite happy with the outcome. There is still a lot of work to be done especially in this area. Most probably it still has to be all covered. And finally this is how it looks like so far.


I hope you like what I have done so far on My Fairy's Nook. There is still so much to do. 

I have also added more fairy's miniatures at My Miniature World Shop which I have made myself.

Fairy's Water Jug and Canister

Fairy's Tea Set and plate of Fruite

Fairy's Candle Sticks


I have also started a new line with some Decorative Ceramic miniature plates which I have made and are also available at my shop.

Set of four Brambly Hedge Plates 'The four Seasons'

Set of Four Flower Fairy Plates
This is all for today. Hope to see you soon. Please keep tuned for more updates on The Fairy's Nook.

Take Care,

Rebecca xxx

Monday, 15 July 2013

The Making of 'My Miniature World' miniature books!

Hello Everyone,

Hope you are all well and doing fine.

Today I will be posting about the making of 'My Miniature World's books. After the great demand I had with the first two books, I have decided to make one post for all the books that I have made so far and for those books that are still to come.  Basically they all follow the same pattern. Now You can Visit our page My Miniature World Books where you will find a few of our books for sale in kit form and Ready Made. We have over 100 books to choose from. Also you can visit our shop at Etsy which offers both in kit form and in download.


My Miniature World Books

Like you all know my books are all readable and have colorful illustrations. They are all designed by me and very easy to do. 


The indexed Spin of the books

My books are all indexed with a number on the spine and this will continue with every new book in my collection. 

Basically to make these books you will need:


1. To print the downloadable book sheet /s which you will find available above in the book list.
2. Card board (even from a cereal box)
3. Masking tape
4. Glue Stick
5. Scissors
6. A small piece of ribbon (approx. 3 mm wide)

Step 1:

After printing your book sheet/s, cut out the book cover. Then cut the book cover templates from a piece of card board. I find it easy by just sticking the template paper on the cardboard and cut them off together.


Step 2:

Using your glue stick, stick the cardboard cover templates close together inside the book cover. Make sure that the templates fit in the book cover. Then bend and stick the book flaps inside the book cover. 

Your book cover will look something like this once it is folded and closed.


Step 3:

 Cut out the book strips and fold them. Glue the ends of the first strip with the beginning of the next strip.The pages are alphabetic order in some books. The download books are printed in order so you won't mix up the  strips when joining them together. 


For those who get their books in kit form there will be a number written in pencil behind each strip so you would know what comes first and after especially in the story books.

After this step you will notice that you have the patterned inner cover pages at the end of the now long strip. Make sure that each page has been folded evenly. Then you can glue the back of each folded page.

Step 4:

Press the folds tight as possible. (You can even use a peg to do the job for you.) Cut out a small piece of masking tape and place it over the spine of the pages. This will help to keep the pages tight together and it will
be easier for you to stick the pages to the cover. Also before adding the masking tape you can add the piece of ribbon with a little glue at the spine of the book at the top part. This will be the book mark of the book.


Step 5:

Use the glue stick to glue the inner patterned cover pages to the inside of the book cover. Make sure the pages are lined in properly with the cover. Sometimes it is even better to position the pages with the book closed.

Step 6:

Finally find the center pages and position the book mark in the center. Cut out the extra length of the ribbon at an angle.


And this is how your book would look like. 


I hope that you will find this tutorial helpful to make my downloadable books. Remember that all my downloadable books follow this pattern. 

Also please note that these books can only be made for personal use. The book sheets and templates can not be copied or resold without my permission.

If you have any difficulty with any of the books please don't hesitate to contact me by email.  

Take Care and see you soon.

Hugs,

Rebecca xxx


Wednesday, 10 July 2013

The Fairy's Nook - More work in progress!

Hello everyone,

I hope that you are all enjoying your summer. Here in Malta it's getting hotter and hotter doe I must admit this summer doesn't feel like summer at all. Maybe it's because I spend so much time at home with the kids that I don't even realize how hot it is outside. I also wanted to welcome a new follower to my Blog; Welcome Susan Edgar!

Today I will be sharing with you some more progress that I have been working on my Fairy's Nook.  As you may have noticed the one room is actually an octagon shape. It is quite spacious for one room but I have to fit everything in this 8 walled room which also has 4 windows and now an arched door. 

First, I started working on the floor. I have closed the small little opening which was originally the entrance to the building. Then I have used lolly pop sticks to cover the floor. It took me quite some time to finish due to the angled walls. Once the floor was covered I varnished it with a walnut stain. 

Covered floor with lolly pop sticks
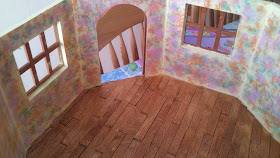
 Then came the interior walls problem. Being a fairy's dwelling I didn't find the right wall paper for this room or at least what I wished for and I just couldn't imagine myself wall papering this room from the top with four windows. So my best option was to actually paint the room myself. I have used a very light yellow paint as the base color then with a ball of cotton I smudged green, pink and orange paint all over the walls. It was the perfect mix for this room and saved me the hassle of papering the walls. So at this point the interior was complete. 

The hand painted walls


The finished interior. 
Another challenge to this property was actually the door. The walls where not high enough to buy a DIY ready made door. The doors where just too big and I still wanted an arched door for this building. So as you all know I opened an arch and made sure that most of the beam work on the outside remained untouched. The problem was I really didn't know how I was going to make the door. I didn't want just a piece of wood cut in an arch shape and fitted in. I wanted it to look like a door. So my best option or the only option that I thought of was cutting a piece of a very tick cardboard and covered it from both sides with lolly sticks. Then I painted it and hinged it. I also added a small handle. It came out better than I thought.

My hand made door made out of lolly sticks


Then I added a front porch. The flooring once again is made out of lolly pop stick and I have added some railing to it. I have painted it with the same color as the wood beams. I have left one of the sides opened on purpose for the entrance. 

Front Porch and door


So this is how it is looking so far. I hope you like what I have done. 

 I have also worked some polymer clay miniatures which you will find available in my Etsy shop My Miniature World Shop. I have made a new fairy tea set and a toad stool fairies' village for a dolls house garden or fantasy project.

Toad Stool Fairies' Village


Fairy's Tea Set
 Well this is all for today. Please keep tuned for the next installment on my Fairy's Nook's progress.

Take Care and See you all soon.

Hugs,

Rebecca xxx


Monday, 1 July 2013

The Beginning of The Fairy's Nook!

Hello my dear friends,

Finally the great day has arrived where I will be sharing with you my new project. It was so very unexpected to start this project especially after completing two projects after each other on make belief which where Santa's Work Shop and The Fairy Tale Tower. I was so sure of myself that the new project was going to be based on facts and reality. My everyday life has been so busy lately that I had to go for a small project once again, and I hope it will be the last of my small projects. I am looking forward to start working once again on bigger dolls houses with more rooms. 

I also wanted to welcome a new follower to my blog; Welcome Ruth! We have hit 70 followers! Thank you so much everyone for finding my blog interesting. It is very encouraging. 

So my new project is called The Fairy's Nook. The original kit was called The Market Cross which is a Dolls House Emporium discontinued Kit. I think it is one of the smallest kits that I have built so far. 


 This small project is going to be a garden fairy's dwelling. The upper room is where this little fairy lives and the bottom area will be transformed into a garden.

So I have gave it a dry built to see what I need to add or adapt to the kit. This building only has a small little floor door with a ladder. No doors in the walls. I didn't like the idea of having a fairy using a ladder and going in her home from underneath so an opening in one of the walls was not an option, it had to be done.


Then I started painting it. I started with all the tudor styled beam work which took me quite some time to finish. I have opened an arch door in one of the walls and painted the outer walls.


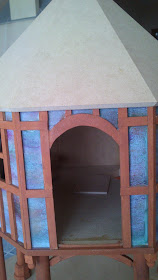
I have started by painting the outer walls with an egg shell blue color. Then I started blending in more colors. I love this technique. I have added green, orange, pink and purple. I really liked the effect. It gave it a shading of a periwinkle color. As I added an arch door opening some of the beam work had to be adapted to one of the walls. When the walls and the wooden beams have been painted I stuck the beams to the building all around. And this is how it is looking so far.

The new door opening with the adapted beam work. 


So far this is what I have completed. I hope you all like it.

Please keep tuned as I will be sharing with you more progress of this new project.

Take Care and see you soon.

Rebecca xxx