Hello my dear friends,
Once again another weekend arrived and February came to it's end. Time does fly. It has been really cold here and I can't wait for Spring and the warmth of Summer. I hope that you are all fine and doing well.
Finally today I will be sharing with you the Final touches on the outside of The Divine Mercy's Chapel.
 |
| The Divine Mercy Chapel |
It has been quite a challenge and I can't believe that the worst of the renovations are over. It has pushed me to my limits and tested my patience dearly. At the end I look at it and at least to my eyes there isn't a hint of what this little property looked like before or endured. It took me a while to finish but it was worth it.
So I continued with finishing the last trimmings on the main roof which is basically a lift-off roof to see the inside. I added the trimming to the roof ridge to add a little bit of character to the building. It is made out of wood and I painted it in black with a metal silver finish.
 |
| Finishing the roof ridge trimming |
The weather wasn't really permitting here in Malta and it took me a little longer to finish the brick work on the walls. I had to wait for the plaster to dry off but finally I managed to finish the back wall, the side and even the front of the chapel. When the plaster was all done and dry, I sanded it slightly and shaded where it was necessary.
 |
| Bricking and shading of the remaining walls |
 |
The porch had to be added to the front while the plaster on the front was still wet so it will have a nicer straight finish. Once that was done, I continued tiling the porch roof, added the last piece of trimmings and added a cross that I made.
 |
| Fitting the porch in place and adding the last roof tiles |
After all that, I could finally start breathing. I added two little birds in the steeple like any church would have.
 |
| Adding little birds to the steeple |
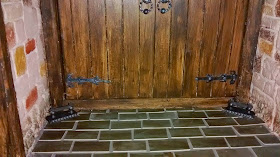
To the front door I added two boot scrappers which at least in Malta most of the old churches still have them. Both these where in white metal and I painted them.
 |
| Adding boot scrappers outside the main door |
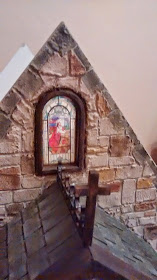
The only thing remaining or at least I felt missing was the windows. The windows in this kit where just clear and very honest not appealing to a church. I thought of using some sort of frosted plastic or even the leaded type of perspex. Somehow these ideas where still plain to the eye. Then I thought that most of the churches had stained glass with images of Jesus and of Saints but I didn't know exactly how to go about them. I have found some lovely pictures of stained glass windows and found about Carole from Poppet Dolly Bits which was kind enough to design them and customize them for my church. She has done a fantastic job and fitted the windows perfectly.
 |
| Adding customized stained glass windows to the church |
I am really pleased how it all turned out. Looking at it gives me great pride and I can't even believe that I was the one to do it. Now there is still a lot to do in the inside. Like always my imagination runs wild and not everything fits in, in such a small little chapel.
So folks here is a picture to remind you of how it was before when I first got it.
 |
| The Chapel before when I first got it |
And here are the pictures of it after the finished renovations from outside.
 |
| The Chapel in it's Glory. |
I hope you have liked what I have done so far. Now I can concentrate a bit more on the inside of the church. So stayed tuned for more updates for March. I highly doubt that it will be done for Easter but I guess one can dream. Wishing you all a very happy weekend.
Take Care and see you soon.
Hugs
Rebecca xxx


Well Done Rebecca! I love the entire finished project and you have thought of so many ingenious improvements to the basic kit making it totally original! The exterior stone work and your roof and bell tower are perfect for the structure. I also like the way that you have repositioned the main entry to the side of the building, which gave the interior more usable space. The stained glass windows are really lovely. I think that you must feel very proud by meeting all of the various challenges which has resulted in such a historic local chapel to grace your little town.:D
ReplyDeleteelizabeth
Thank you so much Elizabeth for your kind words. I am so pleased that you liked it. Yes I am really thrilled how it turned out. xxx
Deletecongratulations to you.. wonderful job you have done.. it is inspiring me to get going on my chapel restoration..
ReplyDeleteThank you so much Christine. I really appreciate it and I am so pleased that you found some inspiration to continue with yours. xxx
DeleteYou have done an amazing job of the chapel. It's wonderful what you have acheived from the first photo to the last. The stained glass looks amazing and finishes off the windows beautifully =0)
ReplyDeleteThank you so much Pepper for you wonderful comments. I still can't believe that it is the same one. Still lots to do. xxx
Delete