Pages

Sunday, 27 August 2017

Designing the Interior of J.R. Art Gallery

Hello everyone,

Hope you are all fine and had a great weekend. August is almost at an end which brings with it sweet memories of my little girl Leah. I can't believe that she's turning 5 years on Tuesday. Thinking about it, the end of August also means that my Summer will soon say, "Goodbye!" To prove my theory right, mother nature  sent us some rain during the week. Believe it or not, after the constant heat we had to endure during these past couple of months,  I was actually thrilled to see the rain. I couldn't help not going out to feel it pouring down against my face. The first rain always brings a smile on my face even though I love my blazing Summer.   

Before I start, I wanted to welcome a new follower to my blog. Welcome Yvette Quinn! During this weekend you can all imagine what I have been up to. Apart from the everyday shores and finishing off a few miniature work for clients, I got to work some more on my J.R. Art Gallery. I was really excited to start working on the gallery itself. 

The Gallery
I always had a clear picture of how I would decorate the interior of the gallery. I didn't want any fancy wall paper or flooring but in the same time I wanted the room to stand out. I started off with the flooring, using a common Victorian tile pattern. I was quite happy with this flooring being quite thick in material and glossy. 

The flooring
For the wall paper I went for a natural color without having any elaborate designed pattern.  After all the walls would be covered with colorful paintings. I just couldn't imagine a fancy wall paper with the paintings. As the wall paper was quite plain, I went for wall paneling which I stained in dark brown matching the interior door of the room.


The flooring and walls blended in well together and I was very pleased with the outcome so far.


After the walls were covered and done. I wanted something a bit more elaborate for the ceiling. The room could afford it. Instead of using a white color, I have painted the ceiling in ivory or a more creamy color. Then I added some ceiling decor which I painted in the same dark brown but shaded it with a bronze color.  From the center of the circular embellishment there will be a 4 tulip ceiling light hanging down to light the room.  


When the ceiling was in place, I got to add the last few trimmings around the gallery's window and door and add the cornice around the ceiling. 


I was really happy seeing the room so complete that I couldn't help myself. I had to add something more to the room.  Finally I got to bring out my two favorite  paintings for the gallery. They are very special as they are my very first two original hand painted paintings on canvas. These two paintings have been painted for me and given as a gift from my dearest friend, amazing artist and fellow miniaturist José Pereira Torrejón.  

Miniature Paintings by Josè Pereira Torrejón

The first painting to arrive was "The Humming Bird".  An amazing piece. I was just stunned with the detail for such a small painting.

The Humming Bird Painting
Then after a few weeks, I received "The Secret Garden" painting. Another amazing piece with so much detail to absorb.  The colors on this one is fascinating. 

The Secret Garden Painting
Both paintings are very precious to me and I could spend hours looking at them taking in every detail. I can assure you the photos don't give them any justice.


From here I would like to say a big "THANK YOU!" to José for both these special paintings. They mean so much to me.  It is an honor to have your work in my J.R. Art Gallery xxx.

I just can't wait to work some more on this project. It keeps getting more exciting everyday with every new miniature or addition to the project.


This is all for today. I hope you liked what I have done so far. I have been working on some new miniatures for both the rooms of this project and hopefully next time we'll meet, you get to meet the artist.......so keep tuned for the next update.

Take Care and See You Soon.

Hugs,

Rebecca xxx  

Tuesday, 22 August 2017

Underneath the Staircase at J.R. Art Gallery

Hello everyone,

So here we are once again. Hope you are all having a good week. I just popped in to give you a quick update on the J.R. Art Gallery project. I am enjoying every moment of it. I have at least to make some sort of miniature or addition to the building everyday, even if it is something small. 

Before I can really work on the inside of the building or finish the last touches of the outside I have to finish underneath the staircase. This time I went for something a bit different. Instead of opening the outside wall, I decided to open the inner wall so the artist has access to the underneath staircase from the gallery.

Underneath the Staircase
As there isn't really going to be access to decorate it or to fill it underneath the staircase I spent the weekend making an artist sink to fit the tiny tight room. There was no way I was going to find what I imagined so I sketched the furniture piece, took measurements and before I knew it the sink was ready. I had one of these bathroom ceramic sink basins which fitted in nicely in the wooden cabinet.


I was really pleased with the scratch built sink and I was eager to decorate it. My box of polymer clay is always handy and I got to make some paint pots, paint brushes and other accessories that are suitable for it.

Hand made accessories
Once I placed the accessories in place it was time to give the sink a new look with splashed paints all around. Yes..... I have gone overboard some would say or that the artist is very messy. I can assure you that the artist is very clean and tidy and he would definitely not leave a mess like this. So why did I even bother to do so????....It's very simple........If I didn't, it would never draw one's eye to look into the doorway underneath the staircase. 


Rest assured that I know what I am doing and believe me I enjoyed messing it all around. The artist wasn't very pleased with my behavior. 

After that I started wall papering the inner walls and flooring. I have used some wall paper that I had stashed and never used and the flooring was actually one of my own designed papers that I printed.


I added the new abused sink in it's place and I liked it even more.


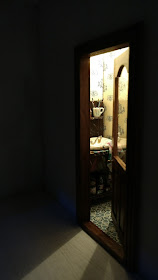
I added a small rice bulb to see how it would look like lit up once I closed the outer wall. I also painted the doorway and left it slightly opened. 


And here is how the room would look like once the light is on. I was thrilled to see it all done and ready.


Now that this room is ready. I can start working on the gallery. At first I will start just adding the wall paper and flooring so I can continue finishing the building itself. 

Hope you like what I have done so far. Keep tuned for the next update on this project. I am very excited and eager to continue.

Take Care and See You Soon.

Hugs,

Rebecca xxx

Monday, 14 August 2017

The J.R. Art Gallery continues....

Hello everyone,

Hope you all had a great weekend and that you are enjoying your summer. Can't believe that August is here and soon I will be back in the same school routine. It's time for me to start preparing the kids for their new scholastic year and this year little Leah will be joining her sister Raquel in junior school. It's going to be very hard on me seeing the little one go. I still can't believe that she is turning five.

Even if the weather is pretty hot, I still got to work on my new project the J.R. Art Gallery. I am so excited about this project and I just love it. It gives me a certain happiness and satisfaction when I work on it. I have to admit it has a very special place in my heart.

J.R. Art Gallery
For the top floor I decided to go for a different kind of brick and shading with a mix of the red brick in the corners. It is the first time that I went for this effect and I wasn't sure that it was a good idea.

I have used once again the stencil method with brick compound. I started first by bricking the quoin of the building using the red brick matching the shop. Once that was done I used a different stencil with a different shade for the walls. 


When all walls were ready and dry, I started shading the bricks individually using different pastel colors. 


I was quite happy with the outcome of the walls especially after joining the two rooms together. I also weathered the walls to match with the below floor.


I was so looking forward to see the building complete and I started working immediately on the roof. So I started off with the roof tiles. Glued them one by one and painted the whole roof in grey.


 I wanted the roof to look realistic as possible so I used the bamboo kebab skewers to make the roof batons and instead of using real lead I went for the house hold aluminum foil.


Once I was happy with the result. I painted the aluminum foil and weathered the whole roof. 


I have to admit, This is the best roof I ever made by far. I still need to add the chimney and pots to the roof once I know where the inner fire place is placed.

I have painted and weathered the edge trimmings, windows and door and I am extremely pleased with the end results.


Finally today, I got to finish the last sign of the shop which was decorated and painted on the glass (perspex) window on top of the shop door. Nothing fancy just the simple "J.R." that have an important significance in this project.


 This is how it looks so far.


I can't wait to start working on the inside of the building. There is still so much to do. At the moment I am writing notes of what I would like to add and accomplish. I will start working first on the under-stairs, It is a tiny room but it has to be the first to be finished before I can really start working on the other rooms.

Hope you like what I have done so far. Keep tuned for the next update on this special project. In the mean time Miss. Leah is keeping an eye out on what is going on with this shop. I think she is excited as much as I am!

Take care and see you soon.

Hugs,

Rebecca xxxx