

Hello everyone,
How are you all? Hope you had a great weekend and are all set for Christmas. Here it's getting quite cold but bearable. Compared to other countries I can't complain.
Today I will be sharing with you a Winter Project that you can use for your miniature Christmas Scenes.
 |
| Snowman teapot |
The American Miniaturist Magazine on December's issue has featured one of my own polymer clay miniature Tutorial It's Time for Tea
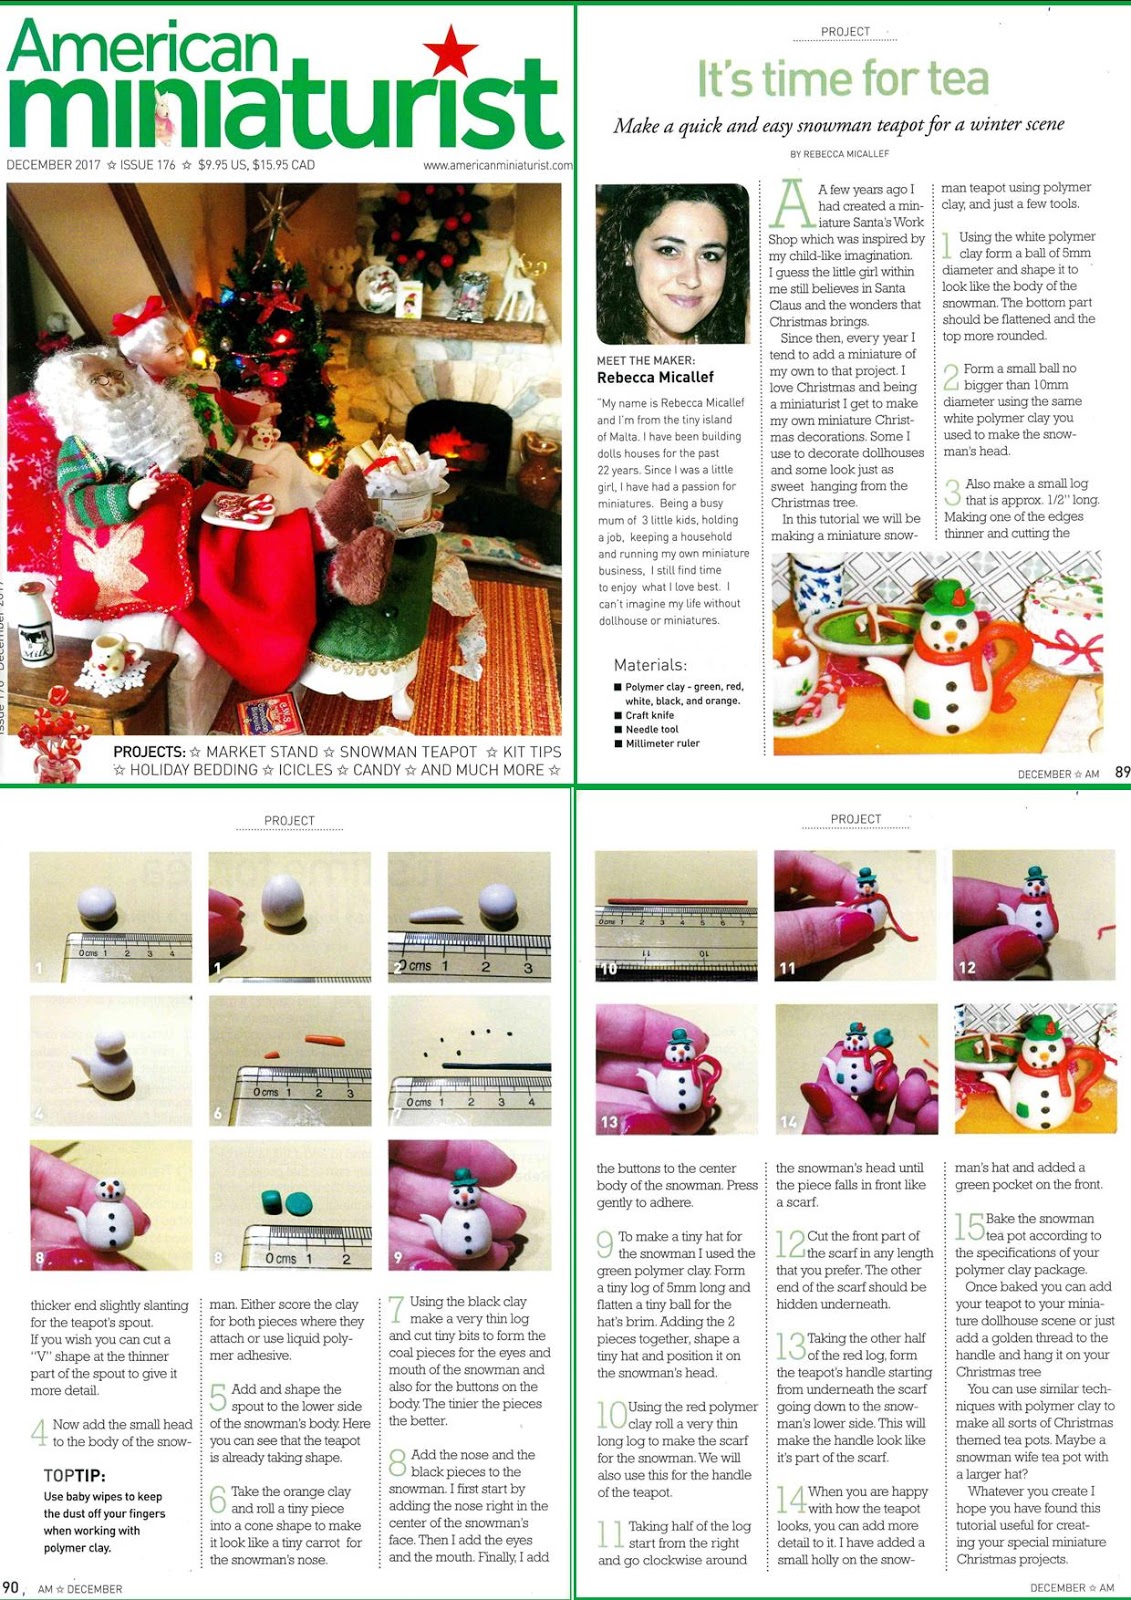
For those who don't have a copy of the magazine. Here is the tutorial.
Here is
the list of materials and tools that you will need.
1) Crafts knife
2) Needle tool.
3) Polymer
clay. I used glamour green, red, white, black and orange.

Step 1


Using
the white polymer clay form a ball of 1.5 cm diameter and shape it to look like
the body of the snowman. The bottom part should be flattened and the top more
rounded.

Form a
small ball not bigger than 1 cm diameter using the same white polymer clay for
the snowman’s head. Also make a small log approx 1.5 cm long making one of the
edges thinner and cutting the thicker slightly slanting for the teapot’s spout.
If you want you can cut a ‘V’ shape at the thinner part of the spout to give it
more detail

Add the
small head to the body of the snowman. Add and shape the spout to the lower
side of the snowman’s body. Here you can see that the teapot is already taking
shape.
Step 2

Take the
orange clay and roll a tiny piece into a cone shape to make it look like a tiny
carrot for the snowman’s nose.

Using
the black clay make a very thin log and cut tiny bits to form the coal pieces
for the eyes and mouth of the snowman and also for the buttons on it’s body.
The tinnier the pieces are the better.

Add the
nose and the black pieces to the snowman. I first start by adding the nose
right in the center of the snowman’s face. Then I add the eyes and the mouth.
Finally I add the buttons to the center body of the snowman.
Step 3

To make
a tiny hat for the snowman I used the green polymer clay. Form a tiny log of
5 mm long and flatten a tiny ball for the hat’s brim.

Adding
the 2 pieces together, shape a tiny hat and position it on the snowman’s head.
Step 4

Using
the red polymer clay roll a very thin long log to make the scarf for the
snowman and the handle of the teapot.


Taking
half of the log start from the right and go clock wise around the snowman’s
head until the piece falls in front like a scarf. Cut the front part of the scarf in any length that you
prefer. The other end of the scarf should be hidden underneath.

Taking
the other half of the red log, form the
teapot’s handle starting from underneath the scarf going down to the snowman’s
lower side. This will make the handle look like it’s part of the scarf.

When you
are happy with how the teapot looks, you can add more detail to it. I have
added a small holly on the snowman’s hat and added a green pocket on the front.
Bake the
snowman according to the specifications of your polymer clay’s brand.

Once
baked you can add your teapot to your miniature dolls house scene or just add a
golden thread to the handle and hang it to your Christmas tree
Hope you have enjoyed this tutorial and that you will find it useful.
In the mean time I'm still working on my new display box and I have so much to share with you. So make sure to keep tuned for the next update.
Take Care and see you soon,
Hugs,
Rebecca xxx
Preciosa tetera navideña! muchas gracias por el paso a paso!
ReplyDeleteBesos.
De nada. Me alegro de que te haya gustado. xxx
DeleteLovely Christmas teapot! Thank you so much for the tutorial.
ReplyDeleteHugs, Drora
You are very welcome Drora. I'm pleased that you liked the tutorial. xxx
DeleteHa quedado una cucada, muy bonita.
ReplyDeleteGracias por el tutorial.
Un abrazo
De nada. Me alegra que te haya gustado. xxx
DeleteEs una tetera encantadora, voy a animarme a hacer una :) Gracias por compartir y feliz Navidad, Rebecca! :)
ReplyDeleteEstoy muy contento de que hayas encontrado este tutorial útil. Feliz Navidad xxxx
Delete