Saturday 26 November 2011

The Stairways!

Hello Everyone,

I hope you're all enjoying your weekend. I haven't posted in a few days. Shame on me! I guess I was busy through work, kids and Christmas preparations!

I want to thank Claudia and Sergio for you lovely comments as usual. You are all very encouraging. 

Well as you all know this was my first dolls house which I built 13 years ago. Like I always say 'there is always room for improvement'. Today I look at this house and if I knew the tricks and trade,  I might have done things differently. I won't change anything for the world doe. There are quite a few memories while building it that I will cherish forever. 

Today I will be sharing the stairways which will complete the house. 
Ground Floor


There are three stairways in this house. The ground floor stairway leads to the main door, the kitchen and sitting / dining room. I have made the hat stand and also the hats and the umbrellas


The hat and bonnet are made out of string and painted. The small roses are made out of ribbon that I managed to turn into little buds. The umbrellas are tooth picks and decorated with lace and material.

1st floor


The 1st floor stairway leads to the main bedroom and the bathroom. I have decorated it with a jardiniere which has roses and small white blossoms in it.


2nd floor


The 2nd and last stairway leads to the nursery and study. The difference between this one and the others is that as it's in the attic floor, one of the sides of the walls is slanting for the roof. Because of this I couldn't do the doors in the right position so I have just made arches to the rooms.


Well I guess this is it!

In the next post I will be sharing with you the basement which has the front garden and three lovely rooms.

So please keep tuned as I have much to share.

Take Care,

Rebecca xxx


Monday 21 November 2011

The Study

Hello once again,

I hope you all had a great weekend. I want to thank Claudia and Charles for your kind comments. I'm so glad that you are following my projects.

Today I want to share with you the last room of the actual house which is the study. Obviously there is still the stair cases and the basement to go through which I will be doing in a few days.

The Study

Well there isn't much to say. The furniture is all done by me with all the soft furniture. The books in the book case too. They are all pieces of wood which have been covered with paper and painted,

All frames have been handmade. And there is also a portrait of Gilbert (my husband) and myself when we where still dating. I have turned it in to a black and white photo. You can see it on the top left hand side on the back wall, almost on top of the fire place. 


The corner fire place was quite difficult to do but I managed to do it too. 

The plant that there is in the corner near the sofa was also done by me. It is made out of wire and floral tape.

Like I said, as it's a small room there isn't much to say. 

Keep tuned as I will be sharing with you more stuff very soon.

Take Care,

Rebecca xxxx

Thursday 17 November 2011

The Nursery


Hello once again,

Thank you Claudia and Angie for your lovely comments.

Today I’m going to share with you my favorite room in ‘Chestnuts’; The Nursery. It took me quite some time to complete with all the little finishings and toys. The children who live in this house are very lucky. They have so many toys and a nanny to look after them and to keep them busy.
The Nursery
Well after choosing the wall paper and carpet. I had quite a lot of work to complete it. As you can see the furniture is hand made too. First I painted the furniture with a white undercoat and then I painted it with a old blue color. After the paint was dried I finely sand papered the blue paint where you can see some of the white undercoat. So  it made the nursery look a bit old too.

The Crib
Then I started the bedding and soft furnishings. I have crocheted the bed spread for the bed and also decorated the lovely cradle with lace and ribbons. I have made cushions, the center carpet and other blankets. Some of the toys are hand made too. The mobile of the cradle has been made by myself too. With string, beads in the form of ducks and some wire.


Some of the other toys that I have made was the rocking horse.


My two little dolls.


Two little dolls made out of pipe cleaner, small sticky bandage for their body, a bead for their head,  tread for their hair, ribbon for their dresses and gyps for their hands and feet.


Jack in the Box


My favorite; Jack in the box was made out of wood, a bead for his head, some material for his dress, Tread for his hair, a biro spring for his body and a small pill's casing for his hat and paint.


My bunny frames


I have also mad these lovely two wall bunny pictures. They are patch worked. They took me quite some time and patience to craft, but they where worth the effort.


The Non Working lamp transformed
Finally we have the non working nursery table lamb which I transformed. As this was my first dolls house that had been built around 8 years ago, there wasn't much choice. This non working nursery table lamp I had purchased i from the Dolls house Emporium collection which has matching book ends. I was so trilled when I bought it but at the same time a little disappointed. It was a pity that it didn't work. A brilliant idea popped in my brain which worked to perfection. It’s lamp shade at first was made out of paper decorated with frills and lace; so I removed the lace from the paper and removed the shade from the lamp. Instead of the paper I used a frosted paper much stronger, decorated the frosted shade with the same lace and frills and while gluing the shade to the lamp I inserted the bulb and wiring. And there the non working lamp was transformed into a working lamp which made the nursery look warmer too.


I hope you liked this room as this is truly my favorite. Will be posting more very soon. So keep tuned.

Take Care and See you all soon.

Hugs,

Rebecca x


Monday 14 November 2011

The Bathroom

Hi Everyone,

I hope you all had a lovely weekend. Thanks for those who left lovely comments. I really appreciate it and it's good to know that there are persons who read my blog.

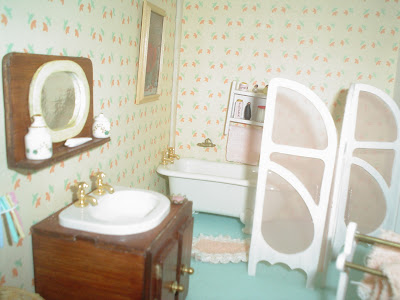
Here's the next room which is Chestnuts bathroom. It quite specious and big.
Chestnuts Bathroom
As you can see all it’s furniture is hand made and painted with white acrylic paint.  except for the obvious which is the bath, the toilet and  the sink’s basin.


I have chosen pastel colors; peach and light turquoise. The carpets and towels have been sewn by myself too. The screen was a bit tricky to do but with a little patience I managed to do it.


Well, I guess that’s all. Even doe there isn't much to say about this room, I think it's an important room as I just can't imagine having a house without a bathroom. I think my favorite accessory in this room is the screen which gives the bathtub more privacy and cosyness.

In the next post I will be sharing with you my favorite room, which is the nursery. So please keep tuned for more.

Take Care and see you soon

Rebecca xxx

Friday 11 November 2011

The Main Bedroom


Today I will be sharing with you the main Bedroom.
The Main Bedroom
As this is a Victorian dolls house, in that era it was very fashionable that a canopy hangs over the headrest of the bed. I have used the same material for the bedding, curtains, bed stool and chaise lounge. I have used a pale blue for this room which makes it look warm and rich.


All the furniture is hand made and all the doors and drawers open. Most of the accessories have been purchased and collected through the years from the Dolls House Emporium.  I have also tapestried  a big carpet for this room. Most of the hanging frames I have printed and turned them in to frames. One of the frames is hand crafted with beads and wire.


I have also hand crafted a fan which I placed on the chaise lounge. I have used a small piece of lace. folded it in several folds, used a little bit of glue on one side of the folds. opened it in to a fan, used transparent nail varnish to harden the fan then decorated it.

That's all for today will be sharing with you the other rooms very soon. 

Take Care

Rebecca x

Wednesday 9 November 2011

The Sitting / Dining Room

Hello,


Thank you all for those who started to follow me and thank you too for your kind comments.


Today I will be sharing with you The sitting / dining room of Chestnuts.


The sitting / dining room in Chestnuts

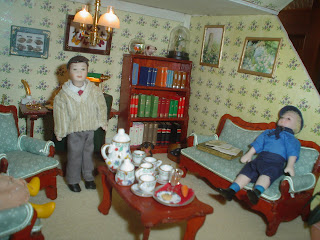
 The furniture is hand crafted.  The table cloth is crocheted and I have made a carpet (tapestry)  made by myself too. The fire place was painted in a way to look like marble. As it was my first dolls house, today I see many faults in it but it is still my favorite.


I love this room as it look very cosy especially as I enjoy hearing the working grand father clock ticking.


During Christmas time it is one of my favorite rooms as it is decorated with Christmas decorations. I will be posting some photos of it decorated just in time for Christmas.


Well I guess this is it! 


Will posting more rooms very soon. 


Rebecca xxx

Monday 7 November 2011

The Kitchen

 I will be showing you individual photos of each room of my dolls house ‘Chestnuts’.  I had called it ‘Chestnuts’ as I had finished it just a couple of days before Christmas. The house has 9 rooms in total including the basement.


Today I’ll be sharing with you my kitchen. It’s quite Victorian with the blue and white colors. As you can see all the furniture is hand made. I have also painted the edging of the furniture in blue so the furniture won’t look that plain.


The Kitchen

I have also made a few accessories like the chair cushions in checkered blue and white material. The small cake that you see on the table is done by me  too. It is made out of 3 buttons. As it is a 3 tier cake the first 2 tiers where plain buttons and the top button was a golden fancy button and it just look perfect as a topping for a cake.


My favorite item in the kitchen is Jennifer the cook. She looks wonderful and makes the kitchen look lived in. I’m very please with her.


So that all for the kitchen. I will be back to share more with you. Enjoy.
Take Care
Rebecca xx


Sunday 6 November 2011

Welcome to my blog!


Hello,

I want to welcome you all to my new blog. where I will be sharing with you my older projects and other works which are still in the process.

Before starting I would like to share with you some information about myself and how my hobby for dolls’ houses started. I am from Marsascala, Malta which is a small island right in the center of the Mediterranean Sea. I am 32 years old, married and a mommy of two. My hobbies are mainly dolls’ houses and crafts.

My very first childhood's dolls house 
Since I was a little girl I have always loved dolls’ houses. My very first dolls’ house was given to me by ‘Santa!’ (my parents)  when I was 4 years old which I still have and treasure. It was a Fisher Price dolls’ house and today my children love to play with it.  I remember  once when I was a little girl maybe 8 years old,  I was watching a movie where there was a nursery which had this massive dolls’ house in it and from that day I wanted a dolls’ house just like it.

As I grew up and become more independent my dream for a dolls’ house was still there and as I always loved crafts, I wanted to build a collectors dolls’ house myself. In 1996 I started building my first dolls’ house. Unfortunately in Malta at that time dolls’ houses was taboo. I couldn’t find anything. So I bought books and 'step by step' magazines which helped me to built the dolls’ house and it's furniture too. By that time I also learnt certain skills and  learnt how to use certain tools.

When most of the dolls’ house and some of the furniture was completed, I came across a small problem. How was I to do accessories for this dolls’ house? The soft furnishing was no problem like beddings, curtains and carpets as I did them myself but how was I to do china wear or glass wear? By that time surfing the internet was  pretty new for me too. I l searched for dolls’ houses and….BINGO! I found out about a whole new world of miniatures and dolls houses. I was thrilled and hooked up for life.

I was amazed with the little tiny things, so perfect and so very detailed. I never imagined that these things could be real and so  I never turned back. It took me 6 years to complete my first as I had also built a basement to fit underneath it. It’s been over 14 years since I have started building my first dolls’ houses. In these past years, since taking up this new hobby my life  had many changes. I turned from a teenager and became a young lady, a wife and a mother. But the love and passion for my dolls’ houses has never changed. I have built other projects through out the years and still have quite a few to start.  I would like to share them all with you in the future. I will do my best to post regularly  with more pictures and achievements. All my dolls houses are mainly kits by the Dolls House Emporium which are 1 inch (1:12) scale


Inside The Chestnuts 
The Chestnuts from outside


The photos posted today are of my first dolls house called 'The Chestnuts' that was built by myself. It is not a kit and the furniture is also done by myself. I will be posting pictures of every room so you can see them closely and I can explain more the techniques in detail. I hope I won’t bore you in the process. If any one wants to ask questions I would be glad to answer them.


Keep tuned as I will be adding more projects after this.

Take Care and See You Soon,

Rebecca xxx