Hello everyone,
Here we are once again! Halloween! The time of year where our ghostly friends come out to play and where our Jack-O-Lanterns glows just for this one night. I remember myself as a child going trick-or-treating for all sorts of goodies. I remember I had this big plastic pumpkin that used to be full of sweets by the end of my task. My favorite sweets were the ginger flavored ones. It was the only time of year that I was allowed to take candy. Today I thank my parents especially my mum for looking out for my teeth ;-)
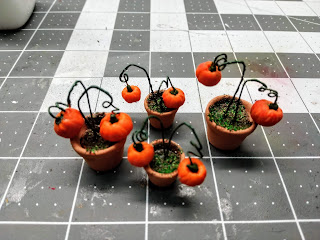
Being Halloween I wanted to share with you an easy tutorial. Something that you could use for Halloween and even all year round. Me being such a pumpkin fan I decided to make miniature pumpkin pots.
Materials that you will be needing are:
Polymer clay (orange, green and brown)
A few pots ( any size will do)
Moss green acrylic paint
(optional: pastel colors)
cutting pliers
needle tool
paint brush
PVA glue
(optional : scenic greenery and soil)
Step 1:
Using the cutting pliers, first cut out various pieces of wire approx 5 cm in length. These eventually will be trimmed. I have cut out eight pieces (2 for each pot) but you can do as much as you like. Put the wire pieces aside.
Step 2:
Taking the orange polymer clay make tiny balls approx 1 cm wide for the largest pumpkin. You can make even smaller if you want. It all depends how big is your flower pot.
With the orange polymer clay balls make tiny pumpkins. Using the needle tool make a dent on top and at the bottom of the ball. Make 5 large line dents all around the circumference from the top dent to the bottom dent to shape your pumpkin. Then add small line dents around to give it more detail.
Once you are happy with your pumpkin add the stem using the green polymer clay. Roll out the green clay into a tiny cylinder (approx 2-3 mm thickness) and add it to the top of the pumpkins.
This is optional: Using pastels brush some autumn colors on your pumpkins.
Step 3:
Taking the cut out pieces of wire. Twist the wire around as you like and with the end part of the wire, puncture the pumpkins at the stems.
Step 4:
Fill the terracotta pots with the brown polymer clay. Make sure that the pots are not plastic as these have to be baked too. Also don't fill the pots to the brim with the clay.
Step 5:
Shape the wire accordingly and cut the extra wiring if they are too long. Make sure that the end of the wire is firm in the clay's pot. Once you are happy with your design bake the pots with the pumpkins according to your polymer clay's brand (I gave them 40 min on a low temperature)
Step 6:
Once the pumpkin pots have been baked and have cooled down, paint the wire with the moss green acrylic paint. Don't worry if by mistake you paint the pumpkins. Take a wet one and gently wipe off.
Step 7:
This is optional. You can paint the base of the pot with brown paint to make it look like soil or using some PVA glue you can scatter some tea leaves from a tea bag or use scenic greenery and soil to make your soil look more realistic. Let the pva set.
Step 8:
Your pumpkin pots are done!
Here are some pictures of my pumpkin pots.
Hope you have enjoyed this tutorial and that you will find it useful.
From here I wish you all a Happy Halloween and a Spooky Fright Night!
Take Care and See You Soon.
Hugs,
Rebecca 🎃


Gracias por el tutorial.
ReplyDeleteHan quedado fantásticas.
Un abrazo
Muchas gracias. Abrazos
DeleteQue original y gracioso,gracias por el tutorial.
ReplyDeleteBesos.
Muchas gracias. Me alegra que te hayan gustado xxx
DeleteLove them, Rebecca!! By the way, I'm also a pumpkin fan! ;)
ReplyDeleteThank you so much José. I know that you are a pumpkin fan xxx
DeleteThank you for this great tutorial.
ReplyDeleteHugs, Drora
You are a very welcome Drora xxx
Delete