

I hope you all had a wonderful Christmas.
Today I wanted to share with you something different instead of my finished projects.
As Christmas brings with it Sweets, chocolate, cakes and all the yummy stuff I decided to do a tutorial of how to make miniature cakes made out of buttons. Yes folks BUTTONS!

I believe there was someone that asked me to give a detail explanation of how to do this and so here it is. It is quite easy to do especially for those who find it difficult to use polymer clay like myself. Although I think I will be trying my hand at polymer clay very soon.
As you all know buttons come in different shapes and sizes. Some of them are just perfect to turn them in to a three tire cake. I always enjoyed doing these and I think they where the first of my creations.

You don't need a lot of items or material to do any of these. You will be surprised that you'll find them roaming around the house. You need:
1) Three buttons
2) PVA glue or super glue
3) Crafts knife or a small saw
4) A fine small piece of sand paper or nail file
6) Tooth picks
5) 2 Paint brushes
6) Various colors of Acrylic Paint
7) Acrylic gloss varnish or clear nail polish.

The most important thing is that you get your buttons correct and just right for the cake. In all you need three buttons which must have the same diameter. Two of them are just the ordinary holed button. It doesn't matter how many holes they have as they won't be seen. These will be used for the tires of the cake. The third button is used for the top part. So this button must not be holed from the top. The button could be a shiny shaped button. You have to make sure that it's design and shape are fit for a cake.

1) Top of the cake button
Firstly we start by removing the back piece of the designed button which is used for the top of the cake. You can use a craft knife to remove it if the button is made out of plastic. If the button is made out of metal, don't worry, you can use a saw or something to clip it off. It is important that this piece is removed and that the back of the button is flat.

After that glue together the buttons like shown.
You can use PVA glue or super glue. I prefer using PVA glue as it gives you some time to set the buttons in the right position. Make sure that the buttons are aligned in a straight line. Let the glue set. At this point you might find that the buttons looks strange and that they don't look like a proper cake. Note that this is not the finished cake yet.

3) Smoothing off the edges.
When the glue is set take a piece of fine sand paper and smooth off the edges of the buttons. This can also be done with a nail file. Please note that some buttons don't need to be sand papered as they already have a round finish. I usually only sand paper around the cake as it also helps when painting the cake.

Use 2 tooth picks to hold the cake upright by placing them in the button holes. Paint the whole cake with a white acrylic paint. This is used as an undercoat. It helps to make the cake look whole. As the top button and the other buttons differ from each other it is always best to have an undercoat. At this point make sure you leave the paint dry properly.

5) Decorating the cake
When the undercoat has dried up you can start painting your cake and decorating it the way you like. If you'll be using different type of colored paint always allow the other paint to dry up first as you'll end up smudging the whole thing. For small details it is best to use a fine paint brush. See what is best for your cake. This is your cake and you can do whatever you like. Let the paint dry throughout.

6) Varnish
When the paints are dried throughout, paint the whole cake with a glossy clear acrylic varnish. This will make the cake look more moist and yummy. If you don't have varnish you can use a clear nail polish. Thinly varnish the cake twice.
When ready and dried you can place it on your cake tray or plate.
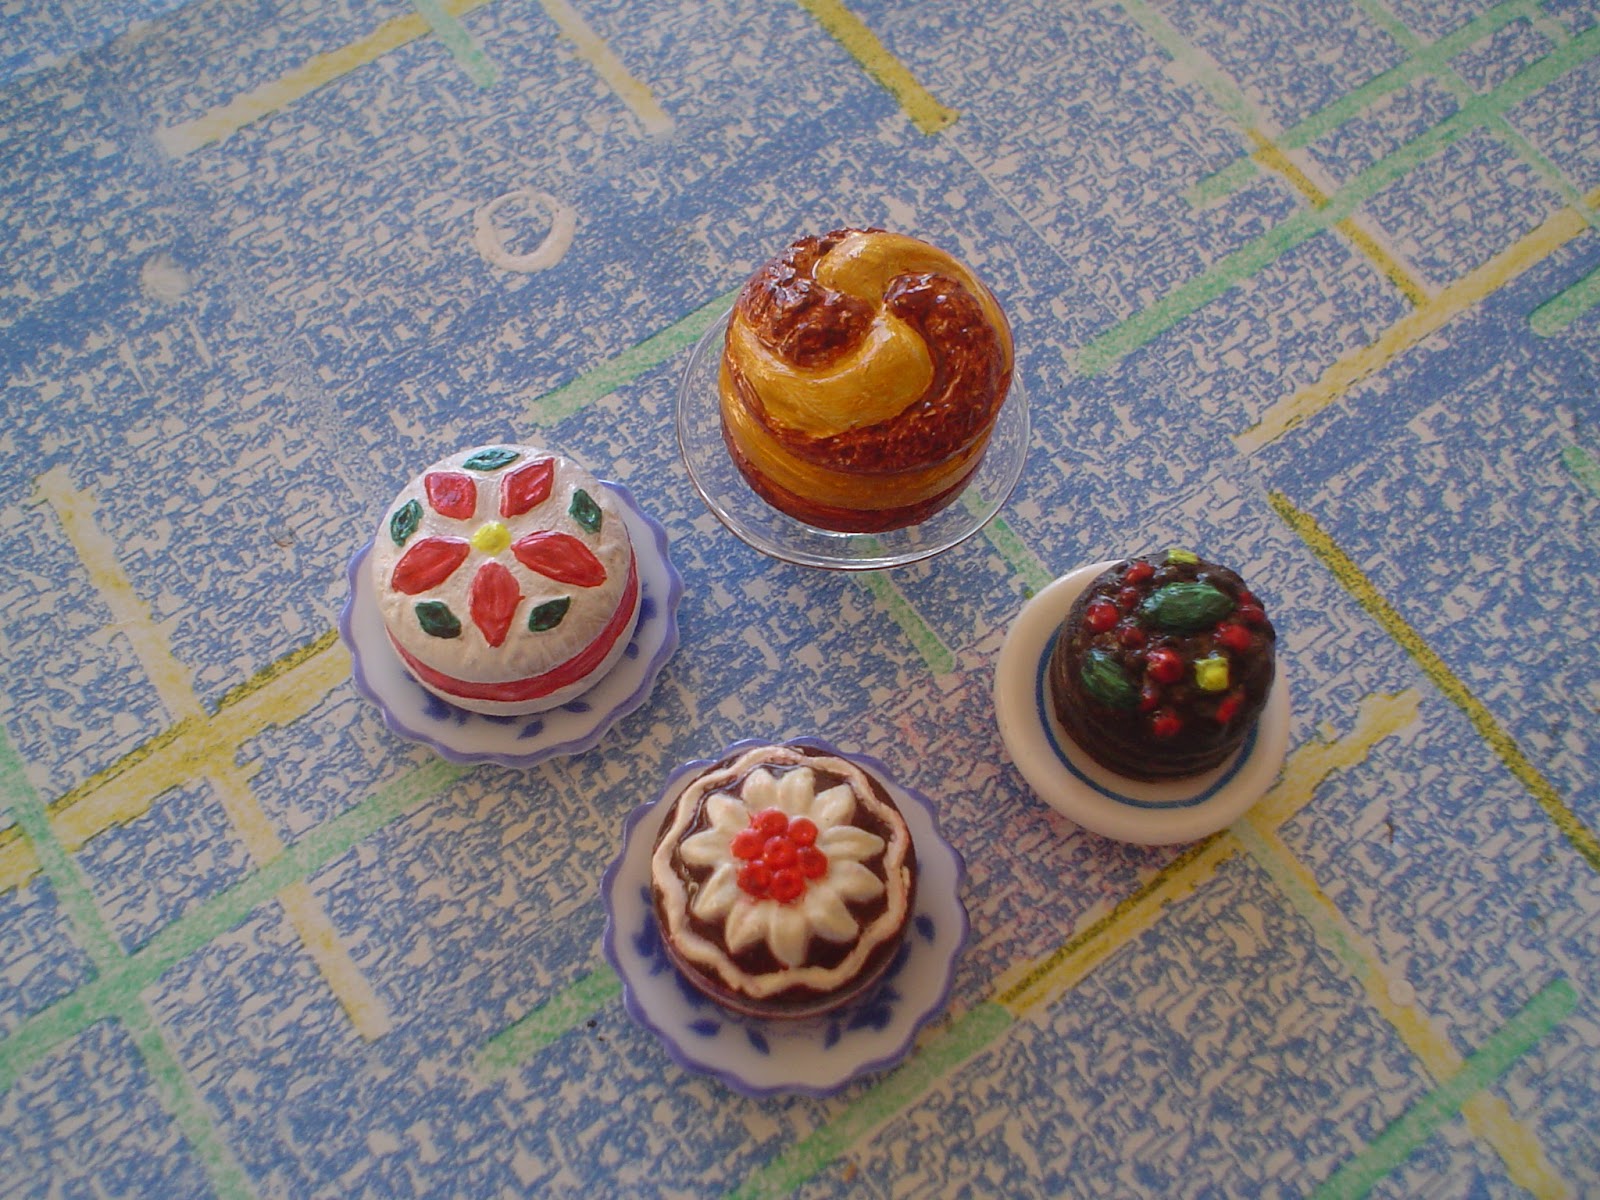
Here are some samples of the cakes that I made with buttons.

I hope that you found this tutorial helpful. If you have any difficulties please don't hesitate to drop a line and I will be very happy to help you out.
Well folks this is it for today.
Please keep tuned for more of my projects.
Take Care,
Rebecca xxx
Very clever and effective!
ReplyDeleteThanks for sharing
DeleteWhat a great idea, very clever.
ReplyDeleteThat's very clever, I never would have thought of that, thank you.
ReplyDeleteVery clever.
ReplyDeleteThank you for posting this - I will be trying this one myself.
They look fantastic. I haven't tried using polymer clay yet as it looks too difficult but will definately give your cake buttons a try :).
ReplyDeletethanks for the tutorial! i was very curious as to how you made cakes from buttons.
ReplyDeletei am very impressed with the results!!
Wow - briiliant idea
ReplyDeleteOff to have a go myself
Love your cake tutorial, I'll be haveing a go at that. x
ReplyDeleteBy the way I'm Chris55 from DHE.
Thank you so much, Rebecca, for this interesting tutorial. I will certainly be trying it.
ReplyDeleteYou are very welcome xxx
DeleteThese little cakes are so cute. They will be fun to make and decorate. Thank you very much for sharing this tutorial.
ReplyDeleteYou are very welcome and I am pleased that you found it useful xxx
DeleteLove this idea but I enjoy making them in Fimo. You must give it a try Rebecca
ReplyDeleteOh yes I do those now
DeleteWow! They are adorable! Very good work there
ReplyDeleteI see cupcake earrings in my future.
Thank you so much xxx
DeleteOmg so cute 💙💙💙
ReplyDeleteThank you so much
DeleteI think I could make this. Thank you for the clear explanation!
ReplyDeleteThank you so much 😊
DeleteUna manera muy ingeniosa de hacer la parte superior del pastel; muchas gracias!
ReplyDeleteThank you so much. You are very welcome 🤗
ReplyDelete