Tuesday 22 May 2012

Rose Bud Cottage - The Tiny Dolls House

Hi Folks,

How are you? Hope you are all fine. 

Today I will be sharing with you my latest project. It's a bit different from my others.  I managed to finish it today. It's my smallest dolls house that I have. I just can't believe that it is actually complete.

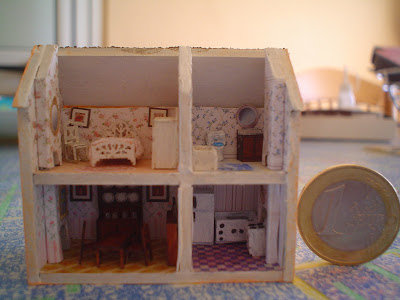
Rose Bud Cottage is a 1:144 (micro) scale unlike my others which are 1:12 scale. It is 6cm high including chimneys and 5.5cm wide. 

When I got the kit I was not sure if I really wanted to do it and less more when I saw the tiny pieces of furniture that I had to build and paint, as all the furniture comes in a kit form.

I have also wall papered the walls and papered the floors. I have added some pictures frames, mirrors, carpets and a clock which I printed. 

Any way finally I have managed to do them and I'm really pleased with the outcome.

I'm not sure if I'll ever do another one like this, but looking at it I might give it another try. I am very sure that Gilbert my husband will urge me to do another one  as he's not that keen on my other dolls houses due to the lack of space. I'm very sure that he will be very trilled when he sees it as I can easily hide it on a shelve without annoying him.

Well as in furniture the kitchen has a sink unit, fridge and an oven. The living room has a table and 2 chairs, a dresser and a small book shelf. The bedroom has a bed, a rocking chair and a tollboy. The bathroom has a bathtub, a sink and the toilet. All 4 rooms have a chimney breast.  

So here it is. I hope you like it. Sorry for the poor quality of photos but as it is so tiny, my camera can't zoom in. I am very sure that you can all see it.

Keep tuned for more.

Take Care and see you soon.

Rebecca xxx


Rosebud Cottage from the outside


Inside Rosebud Cottage

You can see the bedroom and the bathroom

The living room and kitchen


Thursday 17 May 2012

Little Angel's Toy Shop

Hello Everyone,

Hope you are well. Here in Malta it's getting pretty warmer even if in the past few days it has been a bit windy and chilly in the evening.

Today I will be sharing with you one of my latest projects. It was hand crafted and built by myself with some  help from my husband Gilbert. Little Angel's Toy Shop was copied from a Dolls House Emporium discontinued designs called M. Poppin Toys.

I have used the same measurements  of the original shop and drew it on a MDF sheet. Obviously Gilbert not allowing me to use anything sharp and afraid that I might get hurt, cut the wood for me.


Little Angel's Toy Shop

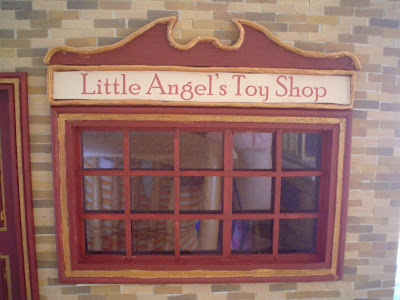
I have built it and bought some dolls house building accessories for the whole project. The only difficulty that I came across was the shop sign. When I said I wanted a copy of the original Toy shop I truly meant it. Saw I drew the design, cut the wood and trimmed it with air dry clay to match the original shop's sign. 

I had also tried my hand with brick tiles for the walls and the roof slates which I'm very pleased with the results. 


The sign of the Shop

Decorating the inside was as easy and as fun as usual.  I have printed some cherubs and stuck them up on the ceiling of the shop. I have purchased bear wood furniture so I could paint it and decorate it the way that I like it.

The fun part came along when placing the toys and boxes in their places on the shelves. I have also built and decorated a made to measure small table myself for the little dolls house  that I had purchased for the shop and it just fitted the scene perfectly.


The small table for the Little dolls House


The Shop window from inside


Inside the shop


You can also see the cherub ceiling


So here it is I guess. I hope you all like it!


Keep tuned as I still have some bits and pieces to share.


Take Care


Rebecca xxx


Saturday 12 May 2012

More Polymer Clay Minis

Hi Folks,


Firstly I would like to thank you all for your kind comments and encouragement. It means a lot to me and I also would like to welcome the new followers of my Blog. It is good to know that there are persons that find my miniatures interesting.


  Yesterday I finally finished some more polymer clay minis. This is getting very addictive and I hope to slow down a bit as I still have an unfinished dolls house to complete. Hopefully I wish to complete it before the baby arrives and that will be somewhere around 10th September.


 I have done a working bed side table lamp for my Chestnuts dolls house. I have placed it in the guest's room bedroom as the room didn't have enough light.


The working bed side lamp

The lamp in Chestnuts guest's room (not lit)

The Lamp lit on


I have also made a plate stand where I have decorated it with a golden rim, golden decorations and small pink roses. I have also made a pyramid of chocolate profiteroles (my favorite) to put on the stand. I haven't stuck the profiteroles on the stand as I didn't want to cover the plate's decoration. So far I have put them in Butterfly Cottage which is almost ready. 


The Plate Stand

The plate stand with the golden decor and pink roses

The plate stand with the profiteroles 

The Plate stand with the profiteroles in Butterfly cottage


I'm pleased with the out come even if I am pretty sure that there is a lot of room for improvement. I tried to start with the easy miniatures but my eyes always fall on the most difficult items or for the most advanced but I think I have managed. 


I hope you like them too.


Please keep tuned as I have more to share with you.


In the mean time, Take Care.


See you


Rebecca xxx

Saturday 5 May 2012

My First Polymer Clay minis

 Hello Everyone,


It's been a while since I wrote on my blog. I have been quite busy preparing for the new baby before the heat of summer starts and hits me hard.


I have done so much today! And I'm really over the moon. I have been dying to start my hands with polymer Clay only that I was just afraid that I don't have it in me or that I will end up burning the whole oven while baking. I had tried some items with air dry clay but this polymer clay had always fascinated me.

Anyway months ago I had bought myself some polymer clay and tools to start off only that I never did begin. Today I built up some courage and put my hands to work.

My Sea View (Lake View) sitting room's coffee table looked a bit empty so I thought I would make some accessories for it. I have marbles white and red polymer clay and started with a modern vase, made another vase that I filled up with flowers and a small bowl that I filled up with real sea shells. 

For a first timer I think I did pretty well, even do I'm quite sure that I'm very green at it. The baking went to perfection which I'm very happy with.

Any way. Here they are my first master pieces with polymer clay. I hope you like them.

Keep tuned as I have some more projects in store to share with you.

Take Care

Rebecca xxx