Thursday 29 March 2018

The Guestroom in The Master Swordsman Pub & Inn

Hello everyone,

Hope you are all having a great week and looking forward to Easter. I have had some days off from the office and I got to do so many things. Have been working hard on the new Studio as now it has reached it's final stages. I also got to work on my project The Master Swordsman Pub & Inn.

The Guestroom in the Master Swordsman Pub & Inn
 The room was quite big and I was quite sure I could fit in easily what I had planned. Before I even started I took some measurements and fitted in the pieces of furniture that I had planned for. For sure I wanted to add a very tiny room, like a small cubical just to give the impression that there is a bathroom. 


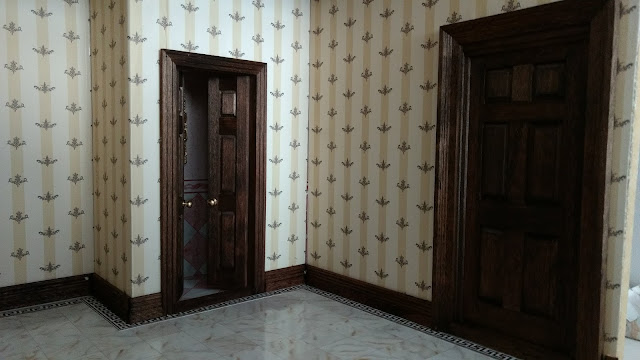
I started off with wall papering the room and I used a different wall paper and tile floor for the tiny bathroom. 


Once the wall paper, ceiling and flooring was done I started working on the walls for the cubical which I made out of wood.  The only thing that I added to the room was a sink with vanity and a mirror. 


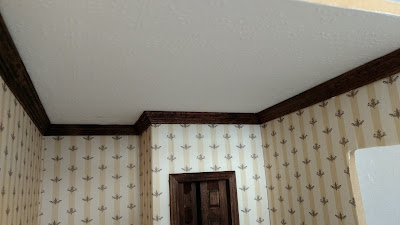
Once that was complete I started working on the cornice of the room and skirting. The ceiling has an embossed pattern paper. I have stained the cornice, skirting and interior doors in matching dark oak. 


It is unbelievable what a difference it makes when cornice and skirting is fitted to a room. It looks complete. I'm very happy how the dark trimmings gave the walls and flooring that extra detail. 


As the room was ready, I added the furniture pieces that I had in mind for it. 


I wasn't happy with the bedding of the bed as it didn't match the room and it was quite basic. So I got out my sewing basket, found a needle and thread and did the new bedding for the bed. I went for some ivory silk fabric and cotton with a tiny floral print. 


There is still so much that I need to add to the room like wall frames and a few more accessories. And this is how the room looks like so far.


As today would be the last post before Easter. I wish you and your loved ones a Very Happy Easter. This year tiny Posy is celebrating her first Easter ever.


So this is all for today. I hope you have liked what I have done so far. I can't wait to continue adding more. Keep tuned for the next update on this project. 

Take Care and See You Soon.

Hugs,

Rebecca xxx

Monday 19 March 2018

Adding More to The Master Swordsmen Pub & Inn

Hello Everyone,

How are yo all? Hope you have enjoyed your weekend. It was a great one for me. Apart from working on lots of miniatures for clients, I still found the right amount of time for my own miniature project. I loved every moment of it and I'm going to share what I have been up to. Before I start I wanted to welcome the new followers to my blog.  Welcome!

I have worked a little bit more on the bar area of The Master Swordsmen Bar & Inn. 

The Master Swordsmen Pub & Inn. 

After getting a few supplies, I was very curious how the bar area would look like. I ordered all the furniture pieces in bare wood so I could match the same coloring of the fireplace and wall paneling.  It is always the same problem, You imagine one thing and as soon as you start filling the room with furniture you get a different picture.

I knew that the bar area was going to be a challenge and I couldn't find a ready made bar counter to fit so I took some measurements and did one myself. 


Once the counter was ready. I just spread out the furniture pieces around to have a good idea of how I wanted it to look. Space is always an issue. I was sure that underneath the staircase I wanted shelving for the bar. 


The under stairs were going to be the biggest challenge of all. A challenge that I wasn't going to give up on that easily. For some reason, I din't like how the stairs and landing joined. There wasn't that continuity of the stairs to the landing so that was something that needed to be changed. I took a few measurements and started sketching. The first two sketches were a complete mess, a total embarrassment, until I figured out what I had to do. Finally, today I got to finish the shelving underneath the staircase which also has a wine rack. 


I was thrilled with the final result. I manage to make the staircase, the landing and the shelving as a whole unit. What I liked the most was that even if it looked simple it looked sturdy and complimented the bar counter. I got to add a few accessories to the shelving. Not completely happy as I still need to add more shelving to the side.  


The bar counter definitely needed something more, I darkened the stain and managed to decorate it with some jewelry findings. 


The fireplace got it's basket with coal which fitted the surronding perfectly and eventually it will be lit. 


I stained the chairs, stools and tables to match with the rest of the furniture. Very disappointed with the upholster of the chairs.  They looked cheep and definitely didn't match the room.


I had to change the fabric of the chairs and also trimmed them with a very fine bronze braid. 


The fabric blended in nicely with the room. The chairs looked more classy and rich. Using the same fabric I also upholstered the seats of the bar stools. 


And this is how the room looks like so far. There is still lots to do, but I'm pleased with the outcome so far. 


I'm sure in the long run, there will be some changes but for now it will do. 

Hope you like what I have done so far. I can't wait to continue working on this project. Keep tuned for the next update. 

Take Care and See You Soon.

Hugs,

Rebecca xxx

Tuesday 13 March 2018

Completing the Queen's Bedroom Diorama - Queen Mary's Dolls House

Hello Everyone,

Another week has gone by once again. Hope you are all well. It' been a rough few days for me. Have been under the weather and couldn't do much. Spent the days indoors taking it easy as much as I could. 

Queen's Bed Room
As a few already know I had started the Queen's Bedroom Diorama back in 2016. A beautiful collection with a few replica furniture pieces from the Queen Mary's Dolls House that is in Windsor Castle in the United Kingdom. 

Having a very bad cold with a constant splitting headache, I couldn't do much, so I did a little work on the labels for the dolls houses which are to be exhibited very soon to the public. 


While making the labels I realized that the Queen's Bedroom wasn't completed and that I had forgotten all about it.

So I decided to add the final additions to the room. It brought some sweet memories when I actually visited the Queen Mary's Dolls House in Windsor Castle last July. It was a dream come true, a magical experience that I will never forget to actually see the real thing. 

The original  Queen's Bedroom is massive; double the size of the diorama and no wonder that this diorama can't contain all the furniture pieces like the original one.  For obvious reasons my diorama had to be adapted but I still tried to keep close to the original. 

For starters I really tried a few  of my own accessories. The dressing table set which was part of the collection was what I would call basic compared to the real thing. 

The dressing table set
Seeing the original dressing table with it's fine rich accessories, there was no way I was going to come close to it but adding a few more accessories would have made a big difference. 
The Original Queen's Dressing table
I got myself a pair of clear glass candle sticks, did the silver jewelry boxes with polymer clay, added a few more hair brushes and painted them and added a tiny scissors. 

My improved queen's dressing table

The original bedroom has two interior doors and two beautiful tallboys. There was no way I could fit two in the room, but what really caught my eyes were the amazing detailed figurines on the tallboys. 

Original tallboy in the Queen's Bedroom
I decided to add a figurine which I hand painted myself.


 While I was in Windsor and came in front of this particular room I noted that the room only had two paintings. The first one was the Queen's Mother the Duchess of Tech painted by F.O. Salisbury. This painting is the one that you see on the mantle piece above the fire place. Then there is another painting which is quite hidden I would say, Mary Queen of Scots by Gerald Kelly. For some reason the story of Mary Queen of Scots always fascinated me even as a child so I decided to add the one painting.

Mary Queen of Scots Painting in frame

I added a few more pieces to the mantel piece of the fireplace.  Have added a few matching vases and also added the mantel clock that I painted too.  I got to 
add the silver mounted wall candle holders which I have painted too to match with the original setting. 


Finally the one thing that I really wanted to add to the room was an interior door. At least one of the doors I would say. The diorama looked too plain without a door so I really tried hard to come close to the original room. 


I was quite pleased with the outcome and now I can say that the Queen's Bedroom Diorama is complete. 

Here are a few more pictures of the room. 


Now the diorama is in it's rightful place among the other projects ready to be displayed. 

Hope you like what I have done with this project. 

Hopefully I will be sharing with you a new update on the ongoing project of The Master Swordsmen Pub & Inn very soon, so make sure to keep tuned. 

Take Care and See you soon.

Hugs,

Rebecca xxx