Monday 24 December 2012

Simple Christmas Angel Mantel Piece Miniature

Dear Friends,

Christmas Eve! Are you all prepared for the big day? Kids are very excited as Santa is coming tonight. I am also happy as we are celebrating Leah's first Christmas. 

Today as a little treat I wanted to post a  simple Christmas Tutorial that I did. It is a Christmas decoration that I have done and placed it in my Santa's Work Shop 


To make this simple mantel piece you need:
  1. Small pointed scissors
  2. Paint brush
  3. Tooth Pick
  4. Glue
  5.  Tape
  6. Glossy varnish (or clear nail polish)
  7. Transparent Red Polymer Clay (Fimo)
  8. 4 golden 5mm beads
  9. Miniature holly garland or leaves
  10. Silver (mirror) Card board
  11. Tick Golden card board
  12. Jewelry wire (dark shade)
Step 1.


Take a piece of the transparent red polymer clay and roll a log of around 6mm tick. Then cut the log in 3 parts in different sizes (approx 25mm, 20mm, 13mm long.) The sizes are there to give an indication.


 Step 2.

With the end of  the paint brush, push in slightly one of the ends of the clay piece. Make sure the piece remains straight and round and the edge of the candle is nicely shaped. This is to make the candle looked used.

You can also dent the edge of the candle by using the point of a tooth pick.


Take the jewelry wire and cut three pieces. These are to be placed in the center of each candle to make the wick.


 After this bake the clay for 30 minutes on low heat or follow the guide lines of your Fimo pack.

 When the clay has cooled down, varnish the top of the candles twice. This will make the effect of melted wax. Let the varnish dry. There your candles are ready/ 


 Step 3.

Cut the Angels using the template provided. You can print the angels on your silver cardboard. On the back of one of the angels stick a piece of wire with a small piece of tape. Then stick the two angels back to back so the silver shaped angels are outwards. You can also use a silver ink felt pen to go around the edges.


 Cut a rectangle (approx 30mm x 25mm) from the thick golden cardboard, This is for the base. Stick the angel in the centre by bending the wire 90 degrees. Leave a little space between the angel and the base. Stick the wire from the angel to the base with some tape. Then stick the candles in a triangle formation keeping the small candle in front of the angel and the other two behind the angel at the sides.


When the glue is set stick the little piece of holly garland or leaves around the candles and angel. Then add the golden beads to the holly  garland with some glue to decorate. You can decorate it as you like.


At this point your miniature mantel piece is ready. Hope you enjoyed it and find this tutorial useful..

Please note that this tutorial and the making of this 
miniature, is for personal use only.

Christmas Angel Mantel Piece
I have also made a new movie of my complete Santa's Work Shop project. You can find it on my blog tabs or on this link    http://www.youtube.com/watch?v=fJnnPHJ7knE

Enjoy your Christmas. Wishing you all and your loved ones the best for the festive season. 

Please keep tuned as after the New Year I will be starting my newest project. 

Take Care and See you soon.

Hugs,

Rebecca xxx


Saturday 22 December 2012

Decorating Outside and Finishing Off Santa's Work Shop

Hi folks,

In the last couple of days I have finally finished Santa's Work Shop just in time for Christmas. I am really happy that I have beaten once again the clock. It took me three months to complete and I really don't know how I did it especially with a new born baby.


Santa's Work Shop
Firstly I continued wall paneling the outer wall with lolly pop sticks and then I started tiling the roof with slates. The roof took around 800 slates to cover.


Wall paneling with Lolly pop sticks

Covering roof with slates
Then I added the scenic snow effect on the roof which had the perfect touch to complete it.


Snow Effect on roof


And the last part where the decorations. I have decorated the porch with a Christmas garland that I have made and added some battery lights underneath the porch's roof. In the dark the work shop looks fantastic all lit up. It looks very magical. I  wish I could fit in it.


Decorating the porch


Some photos taken in the dark


Inside the work shop completed
Well I guess now it is complete. Feeling a little bit sad that it's done but I am already preparing for my next project right after the Christmas celebrations. I will be back with you on Christmas Eve for a little treat so please do keep tuned.

Take Care and have a nice weekend.

Hugs.

Rebecca xxx

Wednesday 19 December 2012

Soft Furnishing and Miniatures for Santa's Office

Hello my dear friends,

Christmas is a few days away and I am really looking forward to it. I am still working on this Christmas project but I am very sure that I will finish it before the big day.

Today I am going to share with you some soft furnishing and polymer clay miniatures that I did for Santa's office.

Santa's Office
 The first thing that I wanted to share with you is the lovely arm chair that I did myself for this room. I have chosen a red checkered fabric which fitted in perfectly. I bought four DIY miniature chair legs and the rest of the structure was just made out of plywood that I cut. I have also added a small cushion. I am very pleased with the outcome of this armchair. 

Santa's Arm Chair
Then I did a patch work quilt for Santa's bed. I have chosen a single sleigh bed. Santa uses this bed to take his naps especially for those late working nights. I have chosen different patterned fabric mostly in red and green to fit the Christmasy theme. I have sewn the pillow and pillow case. 

Santa's Patch work quilt


I have added a small table with a green checkered table cloth that I did. I have made a Christmas tea set and a plate with cookies out of polymer clay. They fitted the table just right.

Polymer Clay Christmas Tea Set


 Then to complete the room I have sewn some nice spotted curtains for the dormer window that I have added. I have also made a red shelve near the curtains and made a ginger jar and jug out of polymer clay. Then I decorated the room with some Christmas decorations that I have done. This room is complete and so far I don't think I will be adding anything else to it. 

The setting of the dormer window. 

Christmas Decorations

So far this is what I have done. Now I have to start decorating and finishing the outside which I will be doing in the next few days. Will be keeping you updated so please keep tuned.

Take care and See you soon.

Hugs,

Rebecca xxx

Wednesday 12 December 2012

Inside Santa's Work Shop

Hello my dear friends,

Have you been busy preparing for Christmas? Well I have! I love Christmas, especially since I had my three babies. This year, it is a bit more special as this will be Baby Leah's 1st Christmas and Matthias and Raquel understand more what Christmas is all about.  Both of them seem to be excited and just being around them, reminds me of how excited I used to be.

I am really trying my very best to finish this project before Christmas. I am running out of time but so far it still looks promising. Today I have quite a lot to share with you. I have been working really hard inside the work shop itself.

Inside Santa's Work Shop
Darby the fawn
 I really don't know from where to start as there are so many pieces to talk about. Well firstly I wanted to introduce Darby. I have made a little story how Darby came to be part of Santa's life. 'While Santa was in the woods fetching wood to build toys, he found this lost hurt fawn which needed help. What he could see from her injuries that hunters where involved and the doe mother was no where to be seen. He feared the worse, so he carried her back on his sleigh. On arrival, Mrs Claus not having kids of her own, fell in love with this little fawn and took her under her wing to protect her.'

I loved this miniature the minute I saw her and fitted in perfectly with the scene as she has an injured leg. Underneath the staircase the shelves have been filled with toys and I have decorated the hand rail too with polymer clay candy cane that I did myself.

Underneath the stair case. 
In Santa's work shop I have done four working stations which are The Sewing Station, The Wrapping Up Station, Santa's Station and The Main Station.

The Sewing Station is taken care of by Mrs. Clause. Here you will find a sewing machine to make dolls and teddies. You will also find a working table filled with fabric and haberdashery. I have also made an unfinished doll made out polymer clay and a pipe cleaner.

The Sewing Station


The unfinished doll

Hand painted cuckoo clock 
 Next comes the Wrapping Up Station. Here is where the lovely toys are wrapped up. Here I have printed miniature Christmas wrapping paper and rolled them. I have added some rolls of ribbon and made some presents. Next to the Wrapping Up Station there is a Cuckoo Clock made out of white metal and my fantastic father hand painted it in Christmas colors. He did a marvelous job. 

The Wrapping Up Station.


Hand painted carpenter's tools

Then comes Santa's Station, where the big man himself works. Here you will find some carpenter's tools, pieces of wood ready to be turned into wonderful toys and also toy plans. The carpenter's tools are made out of white metal which have also been hand painted by my father. They look very realistic.


Santa's Station 


Polymer clay paint pots.
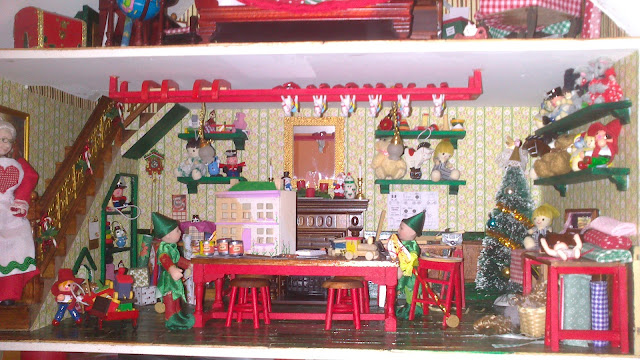
Finally we have the Main Station. This is the large table in the center of the room. Here we find the twin elves Jingle and Jangle who work mostly on this Station. They join the parts of the toys and paint them. I have added some tools, paints and unfinished toys. I have found an unpainted dolls house and train which I have partially painted and decorated. I have also made 3 pots of paint out of polymer clay.  Hanging from the ceiling on top of the main station you find a rack that I have made. I have added  some toys which are waiting to be dried.

The Main Station.


Ceiling toy rack 
All the pieces of furniture where painted by me. Then I made some wall shelves and filled them with toys. This is how it looks so far. 

Inside Santa's Work Shop


I still need to add Christmas decorations to this room but so far I am really pleased with the out come. I hope you all like it

Please keep tuned as I still have more to share on this project.

Take Care and see you soon.

Rebecca xxx