Wednesday 31 October 2018

Miniature Pumpkin Pots Tutorial

Hello everyone,

Here we are once again! Halloween! The time of year where our ghostly friends come out to play and where our Jack-O-Lanterns glows just for this one night. I remember myself as a child going trick-or-treating for all sorts of goodies. I remember I had this big plastic pumpkin that used to be full of sweets by the end of my task. My favorite sweets were the ginger flavored ones. It was the only time of year that I was allowed to take candy. Today I thank my parents especially my mum for looking out for my teeth ;-)

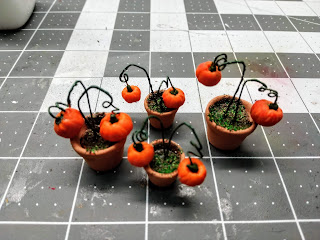
Being Halloween I wanted to share with you an easy tutorial. Something that you could use for Halloween and even all year round. Me being such a pumpkin fan I decided to make miniature pumpkin pots. 


Materials that you will be needing are: 

Polymer clay (orange, green and brown)
A few pots ( any size will do)
Crafts wire 1.2 mm up to 1.5 mm thickness will do
Moss green acrylic paint
(optional: pastel colors)
cutting pliers
needle tool
paint brush
PVA glue
(optional : scenic greenery and soil)


Step 1:


Using the cutting pliers, first cut out various pieces of wire approx 5 cm in length. These eventually will be trimmed. I have cut out eight pieces (2 for each pot) but you can do as much as you like. Put the wire pieces aside. 

Step 2:

Taking the orange polymer clay make tiny balls approx 1 cm wide for the largest pumpkin. You can make even smaller if you want. It all depends how big is your flower pot. 


With the orange polymer clay balls make tiny pumpkins. Using the needle tool make a dent on top and at the bottom of the ball. Make 5 large line dents all around the circumference from the top dent to the bottom dent to shape your pumpkin. Then add small line dents around to give it more detail. 

Once you are happy with your pumpkin add the stem using the green polymer clay. Roll out the green clay into a tiny cylinder (approx  2-3 mm thickness) and add it to the top of the pumpkins. 

This is optional: Using pastels brush some autumn colors on your pumpkins.  

Step 3:


Taking the cut out pieces of wire. Twist the wire around as you like and with the end part of the wire, puncture the pumpkins at the stems.

Step 4:


Fill the terracotta pots with the brown polymer clay. Make sure that the pots are not plastic as these have to be baked too. Also don't fill the pots to the brim with the clay.

Step 5:


Shape the wire accordingly and cut the extra wiring if they are too long. Make sure that the end of the wire is firm in the clay's pot. Once you are happy with your design bake the pots with the pumpkins according to your polymer clay's brand (I gave them 40 min on a low temperature) 

Step 6:


Once the pumpkin pots have been baked and have cooled down, paint the wire with the moss green acrylic paint. Don't worry if by mistake you paint the pumpkins. Take a wet one and gently wipe off. 

Step 7:


This is optional. You can paint the base of the pot with brown paint to make it look like soil or using some PVA glue you can scatter some tea leaves from a tea bag or use scenic greenery and soil to make your soil look more realistic. Let the pva set.

Step 8: 


Your pumpkin pots are done!


Here are some pictures of my pumpkin pots.


Hope you have enjoyed this tutorial and that you will find it useful. 

From here I wish you all a Happy Halloween and a Spooky Fright Night! 

Take Care and See You Soon.

Hugs,


Rebecca 🎃

Monday 29 October 2018

The Netherlands and Me!

Hello everyone,

Hope you are well! I can't complain at all. In fact I am still trying to recover from the wonderful experience in The Netherlands. It's been a week today since I arrived on the island. I have been really busy trying to pick up the pieces from where I left off and have worked hard on orders for my clients. 

The Big Event                                    Het Kabinet
On Friday, 19th October, Posy and I took an early flight to Amsterdam. Yep! Posy was with me. Most probably she will be sharing her own experience but just like me she is still recovering from after visiting her birth place. 

Once landed on Friday, we visited a lovely dolls house shop in Gouda called 'Het Kabinet' (The Cabinet) I was just stunned to enter into such a wonderful dolls house shop. Thinking about it! It was my very first time to actually enter in such a shop. The wonderful couple and their daughter that own the shop gave me a warm welcome and even gave me a tour of their workshops and the shop. The gentleman being a fine carpenter himself showed me his miniature work and I was left totally mesmerized and speechless. Here is the link to their shop Het Kabinet. If you have the chance to visit Gouda make sure to go there. Even the village is beautiful on its own. 


Saturday was an extra special day. After months of waiting, we finally got to go to Hertogenbosch to visit 'The Big Event' The largest dolls, teddy bears, dolls houses and miniature fair in the world. At least that is what I have been told. Even if it is not the case, to me it was. 

There we spent the whole day roaming around the huge area, looking at wonderful miniatures and works. There were even beautiful antique dolls and toys that leave you just stunned. 

We got to meet some wonderful artists there and luckily enough we got to also meet the lovely Marrie Van Vliet-Moret who is Posy's creator. You can imagine how happy Posy was to see her. 


Apart from the miniature experiences in Gouda and at The Big Event we got to have some sight seeing in Rotterdam. A beautiful city with wonderful places to visit. 

It was hard saying goodbye to The Netherlands.  I have experienced a lots of 'firsts' there. Even though life goes on and I am back in my routine, I have beautiful memories that I will always cherish and never forget. I have left part of my heart behind. I am sure that The Netherlands hasn't seen the last of me.

Here are some miniatures that I got from The Netherlands.

From The Cabinet Shop in Gouda

My favorite piece that I got from Gouda too.

Here are some kits and miniatures that I got from the Fair. 


Last and not the least from the dolls section within the fair I got a pretty dress for Posy. I am sure she will enjoy it during her Spring and Summer days. 


So this is all for today. Hopefully I will get to share with you very soon the progress on the Traditional Dolls House. Keep tuned for the next update.

Take Care and See You Soon.

Hugs,


Rebecca xxx


Thursday 18 October 2018

Working on The Traditional Dolls House

Hello Everyone,

Hope you are having a great week. I have to admit I am quite excited as tomorrow Posy and I will be travelling to The Netherlands for our very first dolls house and miniature fair. I am so looking forward to be there and to meet fellow miniaturists too. 

Today I will be sharing with you some updates on 'The Traditional' dolls house that I am building for my little Leah. She is very happy about it and she is also enjoying herself by helping out.


Before I started working on the house I made sure to finish the basement with its last floor tiles and details. 


Once the basement was settled, I moved on to the house. I gave an undercoat of white paint for the inner walls and painted the outside in the matching eggshell blue.


The inner walls, where the staircase fits, had to be wall papered before I fitted in the walls in place as it would have been impossible for me to decorate afterwards. I went for a nice green wall paper which I think will fit in just right for the staircase


As most of the work was being done on a Sunday afternoon, my little Leah was with me to see her dolls house being built, but on second thought she wanted to help me paint the edges of the house.

I helped her out by showing how to hold the paint brush and how to paint the edges. She did an amazingly good job.


As soon as it dried out, I have placed the roof  and chimneys in place. 


It was time to start painting the windows and the front door. The kit came with plastic windows and a plastic door so I have decided to replace them with wooden ones instead. I find that by time the plastic ones become brittle and even change in colour, so my best option was to have them made from wood. In this case, it was quite necessary to have them replaced,  so they'll match with the ones in the basement. 

I have to admit painting windows is not something that I really enjoy doing and I tend to work on them gradually and not paint them all at once.  This time it was different. Leah was having a ball helping me out with her dolls house and she wanted to do more. She was so eager to help that I couldn't say no to her; besides I was on top of the moon seeing my little prodigy at work. I always knew that she would take after me.  With that in mind I gave her a few windows to paint and I was impressed that she did such a good job. I really hope that the love for dolls houses will grow strong in her. 


Now I started tiling the roof slates. One side is done but I still have to do the other side, paint them and add the details on the outside. 


This is all for today. I will continue working on the dolls house once I am back from The Netherlands, so make sure to keep tuned for the next update.

Take Care and See You Soon.

Hugs,


Rebecca xxx

Friday 12 October 2018

My Miniature World featured on TVAM

Hello everyone,

Thank goodness it's Friday! Another week has gone by and now that the weekend is here I can work a bit more on my project. 

Last Wednesday I was contacted by Clara from TVAM. For those who are wondering what TVAM is; it's a breakfast show aired on the TVM channel which reports daily news, lifestyle, social activities and entertainment, between Monday and Friday from 7:00am and 9:00am presented by Quinton and Clara.


Clara came with her crew on the same day and interviewed me about my dolls houses and other related stuff.


The TV program lasts two hours and various guests are invited to the show. The feature for My Miniature World  was aired yesterday and lasted six minutes. 

Even though it's in the Maltese language here is the feature for you to see.


I am quite happy with it. From here I want to than Quinton and Clara for giving me the opportunity to feature my dolls houses on their breakfast show. 

This is all for today. I will be sharing with you the progress on the new dolls house very soon.

Take Care and see you soon.

Hugs,


Rebecca xxx

Tuesday 9 October 2018

The Houses Rebecca Built - The Times of Malta

Hello Everyone,

Hope you are all fine. Just popping in to share with you some news. Today My Miniature World was featured on Malta's leading newspaper The Times of Malta. 


A few days after the launch and opening of My Miniature World, I was contacted by Matthew Mirabelli from the Times of Malta to have an interview to feature it on the news paper. I was thrilled with the idea. Weeks passed and it slipped my mind but then a few days ago I was contacted by Sarah Carabott who wrote the article and told me that it was going to be featured today. 

So this morning I went to get the newspaper  and I was speechless when I saw a double page feature of my dolls houses. 


I couldn't believe what I was seeing. 

Link to The Houses Rebecca Built

The article has also been featured on The Times of Malta's website and facebook page. Here is the link for those who would like to read it The houses Rebecca built - unique exhibition in Marsascala. Just in case the link gets broken here is a Saved Copy of the article. 

From here I would like to thank The Times of Malta for giving me such a wonderful opportunity. Mostly I also want to thank Matthew Mirabelli for visiting and taking pictures of my projects and Sarah Carabott for visiting too and writing the article. 

Here are a few pictures. All credits go to The Times of Malta and Matthew Mirabelli.


From here I want to thank you all for your constant support and encouragement.  I hope you will like the feature. 

I will be getting back to you soon to share with you an update on the new project. 

Take Care and See You Soon.

Hugs,

Rebecca xxx