Sunday 23 September 2018

Concluding The Master Swordsman Pub & Inn - A Tribute to a Loving Father.

Hello Everyone,

Hope you all had a great weekend. My good old friend Summer said goodbye and once again we're back in Fall. Today we will also be closing the curtains and saying goodbye to The Master Swordsman Pub & Inn.


The Master Swordsman Pub & Inn now stands proudly in Regent Street between Miss Leah's and The Coffee Corner. It took me eight months to complete. It always gets overwhelming when I finish a project especially when it takes months to finish.


I'm very happy how it turned out. I can actually say it turned out even better than I expected. Every room has a special feature, that draws one's attention.

Turning on the lights of the project makes it look magical and more real. Sometimes I wish I could shrink and walk among the dolls and roam around the rooms.


Here are a few pictures of the lit rooms.


The Pub


The Guest Room with its en-suite


The Parlour


The Room behind the stained glass door


The Roof Terrace


I also got to take some photos of the Master Swordsman Pub & Inn among the other shops in Regent Street in the dark with their lights on. I can spend hours looking at them.


I know I am sharing its completion now but The Master Swordsman Pub & Inn was done and ready a day before the launch of My Miniature World. I had to do my best to make sure that this was complete before the big event and for a very good reason. The Master Swordsman Pub & Inn wasn't really seen by anyone before and it was special to have it shown for the first time in the Launch. 


The opening of The Master Swordsman Pub & Inn during the Launch

What made it even more special to have it ready before, was that my father got to see it for the first time complete during the Launch itself. I could say that he was very happy and very proud. To have him there standing in awe before it, only made me realize how strong the bond between us is. He loved every detail.  I couldn't be more happy to have this project as a tribute to him. He has always been by my side in every circumstance; being as a child, as a teen, as a young lady and even now as a woman and a mother. We still work together and he still helps me with my miniatures so the least I could do was this, a project based on his own passion.   

My father the Master Swordsman and I

From here I would like to thank my father for always being there for me. Thank you paps!

So that's a Wrap Up!

I will be working on two dolls house projects now. One of them is for my little girl whom I have promised her a dolls house of her own which she will be decorating herself. The other one is Pembroke Grange which will have a Regency period style. Make sure to keep tuned for the beginning of the new projects.

Take Care and See You Soon.

Hugs,

Rebecca xxxx 

Monday 17 September 2018

Adding the last touches to the Pub

Hello everyone,

Hope you all had a great weekend. It's been quite busy here and frustrating at the same time.  Apart from my miniature world work there are my daily duties and priorities that need my attention. I am really trying my best to keep up with the fast pace I'm living in, but so far I'm managing. 

Today I will be sharing with you the complete Pub area in The Master Swordsman Pub & Inn. 
The Master Swordsman Pub
As predicated there were a lot of changes in this room. To be very honest I couldn't get the room right until I figured out what was missing. I kept moving weapons and other accessories from one wall to another. 

One of my favorite additions to the room was the Knight in armor. An amazing white metal piece that my father built from a kit and painted for me to put in the pub. 

The Night in Armor

The weaponry was the most difficult to place around the walls. No matter what I did they just didn't look good. Instead of the mirror hanging on top of the fireplace I went for another framed picture of my father which was printed on canvas. After all what is the point of having a pub called for The Master Swordsman without having a painting of a REAL Master Swordsman!

My Father - The Master Swordsman Daniel Sammut
With the painting hanging to the wall on top of the fire place, I added a few more helmets on the mantel piece and added a pair of hand painted soldier figurines that my father painted a few years ago. I knew that one day these figurines will adorn a special project. 


I started adding the weapons to the wall. I think I have never played "musical chairs" or in this case "musical weapons" as much as I did with these weapons around the back wall and the fireplace wall. It was agony. It took me days to figure them out. Today they are placed on one wall; tomorrow they are moved to another wall. At the end there was still something missing among the walls. I couldn't add more weapons, because it looked too overwhelming. Then I thought of adding pub adverts and posters. A pub usually would have them and luckily enough I found a couple of Victorian period posters which I have downsized and printed.


With the walls finally decorated and settled I continued adding details to the rest of the room. Every table had an ashtray that I had painted myself. 


On the tables they looked to clean especially for a pub. So I made the cigarettes and butt cigarettes out of polymer-clay and added real ashes from a previous bbq we had during the summer.


"Sir Edwin Barrett inviting Mr. John Corbett to the table for a glass of wine and a chat. Everyone enjoys Mr. Corbett's stories. "

Another piece that turned out quite nice was the hanging  wall clock to the pub. I have made the clock using a chunky button. I must say it looks very Victorian and just right for the area. 


"The handsome bar tender Mr. Larkin Royston is quite busy today but he is still keeping up to his task."

To the table where Mr. Edgar Hervey sits, I have added a miniature journal that I made with readable pages with some of my favorite poems. 


"There is the lovely Susanna; the barmaid  serving Mr. Edgar Hervey with his usual; a glass of  white wine."

Finally we come to the last table and a new comer to the Pub. Here is Mr. Ivor Ward.

Mr. Ivor Ward
"Mr. Ivor Ward is another frequent client to The Master Swordsman Pub & Inn. He tends to keep to himself. He enjoys a pint or two  of ale. The only  thing that keeps him company is a deck of playing cards."

Mr. Ivory Ward is another handsome doll that was made for me by the lovely doll maker Beverly Senatore. 

For Mr. Ivor Ward I have made a house of cards. The playing cards were downsized and printed by me. The house of cards was quite fiddly to make but I am really happy with the end result.


Here are a few more pictures of the pub.


I hope you have liked how the pub turned out. I am very happy with it. I think, it was one of the most complicated rooms to finish off in this project.

I will be posting a few more pictures of the finished project with the lights on, so make sure to keep tuned for the next update.

Take Care and See You Soon.

Hugs,

Rebecca xxx

Thursday 13 September 2018

Completing The Stair Case with A Flower Making Tutorial

Hello everyone,

Hope you are all well. Here I am back to my normal routine and I am back to work on my miniatures and dolls house projects. September is not one of my favorite months. Can't believe that Summer is almost over and the worst part is that the kids will start their new scholastic year. I'll be missing the trio.

 Before I start I wanted to welcome the new followers to my blog. Welcome!

Today I will be sharing with you the complete staircase of The Master Swordsman Pub & Inn, finishing it with a simple flower tutorial.


Apart from the carpeting in the staircase. I added two more paintings which were also printed on canvas and their frames were hand painted by me. The antique paintings are obviously related to sword fighting. The first one shows a pair of gentlemen sword dueling and the second one is one of my favorites; it's a fencing lesson. 


The little hand painted knight was placed on a shelf in the corner of the stairs. I think it has fitted quite perfectly there and gives that extra detail to the stairwell. 


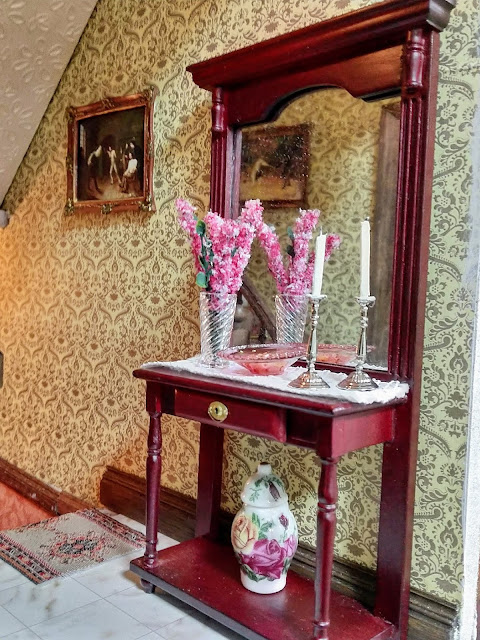
Finally I needed to decorate the hall table in front of the guestroom's entrance door. I wasn't very happy how I decorated it at first. The flowers didn't look realistic at all so I went for something simple yet effective.


These flower are quite easy to do and I will be sharing with you a tutorial how to make them.

All you need is:

PVA glue
craft tissue paper
craft wire
dark green and yellow acrylic paint. 
flower soft (any color of your choice)
a leaf paper punch
scissors
a paint brush. 


1)  Cut a few wire pieces around 5 cm each. These are going to be used for the flowers and for the leaf stems. In total I have cut seven pieces; 4 for the flowers and 3 for the leaves. 


2) Paint the wire in the green acrylic paint. You will be needing to give the wire 2 coats of paint to make sure that it's totally covered. Remember that you will be shorting the wire eventually so there is no need to paint the end that you are holding the wire from. This will be much easier 


When you are done, stick them to a piece of jablo or in a piece of blue tack to let them dry. 


3) While letting the painted wire dry, paint the craft tissue paper in the same green that you painted the wire and let it dry.  Paint the tissue paper from both sides.


I know that there are tissue paper in various colors so why paint it? I prefer having the leaves and the stems in the same color and besides that the paint will thicken slightly the tissue paper which will also help to shape the leaves.


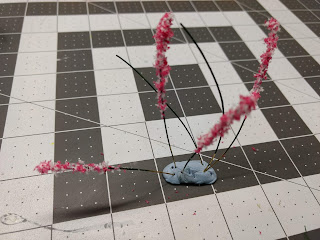
4)  Once the wire and paper are dry, dip the painted wire in pva glue. Make sure that the wire is entirely coated with glue.


5)  Sprinkle the flower soft over the glue coated wire. I prefer sprinkling the flower soft onto the wire than actually dipping or rolling the wire in the  flower soft. If you think that the flowers are not thick enough let the glue set. and add a little more glue to the area and sprinkle again with  the flower soft. 

Once you are ready let them dry .


6)  Using the leaf paper punch, punch several leaf patterns from the dry painted  craft tissue paper.


7) Cut of the leaves from the patterned leaf cut out. I like this leaf pattern because the leaves come in different sizes. 


8)  Using another painted wire add a little pva glue to the steam where you want to add the leaves. Pinch the edge of the leaf and glue it to the wire. You might find a tweezers helpful to pinch on the leaves to the wire.  Then shape the leaves according to your taste. 


Let the glue set and make sure that the flowers and leaf steams are thoroughly dry from paints and the glue. 


9) To make the leaves look more realistic, add a little yellow paint diluted with water to a few edges of the leaves. I would suggest to do this on the bigger leaves. 


10)  Once they are dry and ready cut the extra wire according to the size of the vase or pot you are going to put the flowers. 

Put them in the vase and arrange them to look the part.


There you are all done!


I have added a pair of candle sticks and a glass cranberry bowl with sweets that I made with polymer clay. The candles were made with toothpicks, paint and glue. 


Here are a few more pictures of the stair case.


Hope you have liked what I have done in this area and that you will find the tutorial useful. Looking forward to share with you the progress of the pub area. Make sure to keep tuned for the next update. 

Take Care and See You Soon.

Hugs,

Rebecca xxx