Monday 26 August 2019

The Hallways in Pembroke Grange - Part 1

Hello everyone,

How was your weekend? Hope you have enjoyed it. I can't believe that August is almost over. It also means that my Summer is coming to an end. Now I have to start preparing for the new scholastic year of the kids. I hate September for that simple reason. I miss having the kids around. 

This weekend has been quite busy at My Miniature World. Finally I got to finish the hallways in Pembroke Grange. Today I will be sharing with you the hallway in the ground floor. 


The challenges in this project seems to be endless. As the house itself has only four rooms excluding the hallways, I wanted to add much more to it and give it more depth. I wanted to make it look bigger; if not in proportion at least with an illusion. 

The ground floor hallways leads to two rooms which eventually they will be turned into the sitting room and the dining room. The staircase leads to the upper rooms, the bedroom and the study. I have designed the hallways  a bit more spacious so I could afford using the back.


The new walls and doors were already fixed and I started off  by working on the staircase. I have added wooden strips to the staircase surface to give it a bit more detail.


By now most of you know how I feel about staircases especially the space underneath them. I hate them! They are a waste of space and you can't really use them. So I decided to build an extra wall with an arched opening. This gives the illusion that there are other rooms or hallways in the background. 


I started working on the wallpaper of the hallway. The wall paper was downsized from an original periodic style and printed. For some reason I liked the climbing leaf pattern. 


Once the wallpaper and flooring were settled, I continued working on the staircase. I added the spindles, posts and  the railing in place.


I have added the small wall underneath the stairs and even the new additional back wall. 


With the wall in place I could continue working on the remaining part of the staircase and the ceiling. I fixed the hanging lantern in the middle of the room which was quite common in the Regency period.


Having my new 3D printer I made cherub faces which I added to the door pediments.


Finally I added the false door behind the arch, added the cornice, trimming and skirting around the room.

The false door at the back


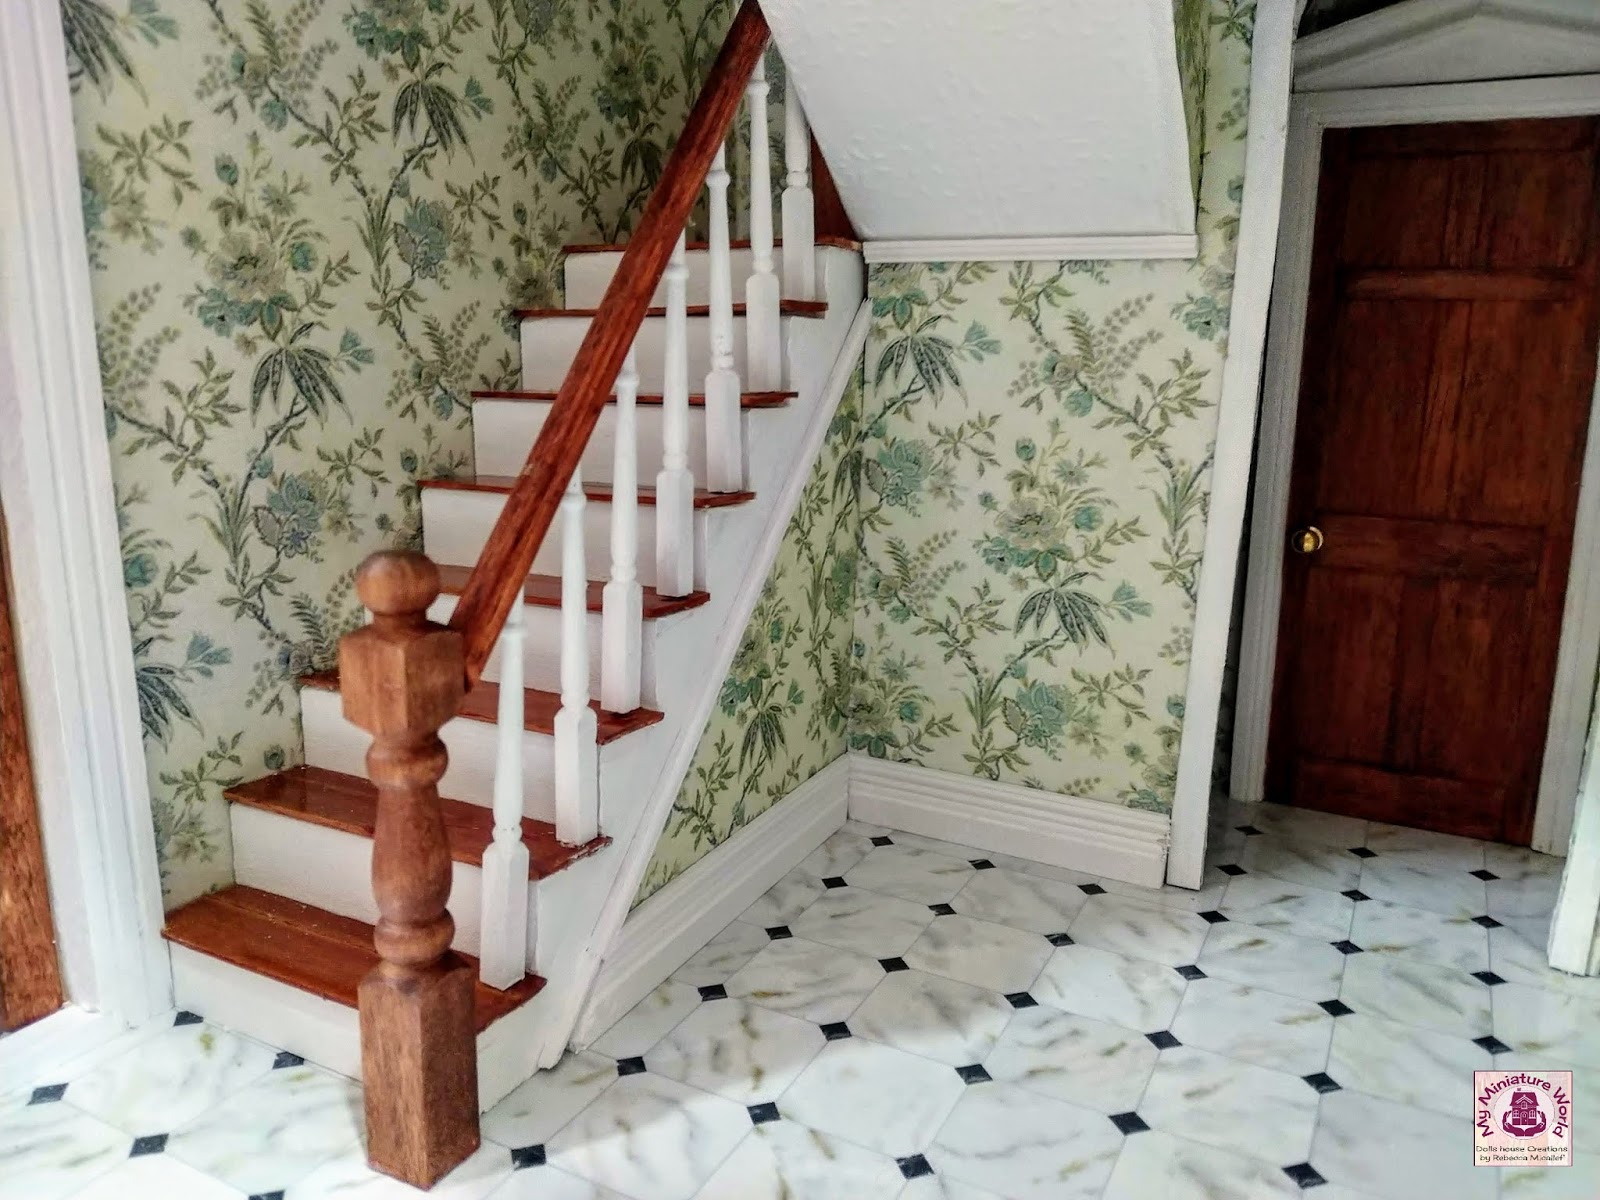
Here are some photos of the complete hallway which is now ready to be decorated.


At the end, I got to lit the hallway in the dark and I really liked the atmosphere.


I can't wait to start decorating the hallway. There is still so much to add. I hope you like it. Very soon I will be sharing with you the second part of the first floor hallway so make sure to keep tuned for the next update.

Take Care and See You Soon.

Hugs,

Rebecca xxx

Friday 23 August 2019

Miss Jane and her Portrait!

Hello everyone,

Hope you are all well and you're looking forward to the weekend. Definitely I am looking forward to it so I can continue working on my project Pembroke Grange.

Today I want to share with you someone very special. Let's say that she is my inspiration behind the project that I am working on. 


Pembroke Grange is inspired by the British novel 'Pride & Prejudice' written by one of my favorite  romantic authors Jane Austen. If I had to pick my favorite books written by her they would be Sense and Sensibility (1811) and obviously Pride & Prejudice (1813).

While doing my research for the project on the Regency Period, I came across the sketched portrait of Jane Austen herself. It is thought that the portrait was sketched by her sister Cassandra back in 1810. I printed the little portrait on canvas and also printed the 3D frame for my project.


 From there I wanted to know a little bit more about Jane Austen. Jane was born 16th December 1775 in Hampshire England. She didn't come from a wealthy family but she was quite the accomplished young lady. Apart from her education and helped with the house shores, she knew how to play the piano and was quite the dancer. She was very close to her father and her older sister Cassandra. Getting to know Jane Austen I could see her life and character being reflected in her six major novels. Unfortunately the world lost Jane Austen at the very young age of 41. Her death was caused by her illness known as the Addison Disease  on 18th July, 1817. 

I also came across another painting of Jane Austen. I am quite sure that this was not an original painting but just an interpretation of the sketched portrait of Jane Austen. The Austens definitely couldn't afford being painted especially after the death of Jane's father. I am sure who painted this interpretation of Jane Austen made a great job.  I also downside the painting and printed it on canvas and made another frame with my 3D printer. 


Looking at the painting of the young Jane Austen a thought came to my mind. I contacted my friend and favorite doll maker Beverley Senatore  and after a few weeks she made a doll inspired by the painting just for me. I would say that the doll is an older version of the teenage girl in the painting. 

Jane Austen


I was blown away with the doll that Beverley made for me. Jane's facial expressions are just perfect. 


I am so happy with the lovely doll. From here I would love to thank Beverley for such an amazing job. No matter what I ask from her she always surprises me. Beverley, I am sure that you made Jane Austen proud.


Miss Jane eventually will be residing in my Pembroke Grange once it is all done and ready.  I hope you like her as much as I do. It warms my heart knowing that I have a miniature Jane Austen roaming around my dolls houses. 

Off I go to continue working on Pembroke Grange. Make sure to keep tuned for the next update.

Take Care and See You Soon.

Hugs,

Rebecca xxx

Monday 19 August 2019

Pembroke Grange's Roof

Hello everyone,

Hope you are all well and you had a great weekend!  I had another progressive weekend on my new Project Pembroke Grange.  

I have been working on the roof of the dolls house. It took me a few days to complete but the end results are worth the time taken.

Pembroke Grange
The roof of Pembroke Grange is basically built separately from the whole building.  I started by dry building it first, to have a good idea how it would look. On its own it is quite heavy and big. 


Once it was glued, I gave it an undercoat of grey paint and painted the rim around it in cream. I also fixed the chimney stacks in place.


Then I started tiling the roof slates. I like to use the wooden ones. I find them easy to cut and paint.


Tiling the roof was quite challenging. It took me a few days to finish off.


Once the tiling was done from four sides, I tiled the edges. These were cut and made by me using cardboard so I could bend them into an angel. 


In all it took almost 1, 500 roof slates. I think this is the largest roof I ever made to date.

A few days later I started painting the roof. I was curious to see how it would turn out once it was painted. I painted it in a dark grey color and also added the chimney pots to match.


I could already see a huge difference once it was painted in one color but then I started weathering it so it will look a bit more realistic like a real roof.


I am very happy with the end result. I must say it is the best roof I made so far.

Here are some pictures of the complete roof in place.


There will still be some more weathering around the chimney stakes, but that will be done once I start working on the building outside. 

I hope you like what I have done so far. I can't wait to work on the inside of the house. Make sure to keep tuned for the next update on Pembroke Grange. 

Take Care and See You Soon.

Hugs,


Rebecca xxx

Wednesday 14 August 2019

Tri-ang No. 76 gets it's Kitchen!

Hello everyone,

I hope your Summer is treating you well! August is our hottest month of the year. This week Mother Nature decided to set a BBQ and apparently she is trying it on the tiny island of Malta. It is really hot so staying outdoors is not an option. I don't mind it at all as I get to work more on my dolls houses. 

As the girls got to work on the kitchen in the Traditional Dolls House, I got to furnish the kitchen in my Vintage Tri-ang Dolls House No. 76.


The kitchen is situated in the first room of the dolls house. Being a vintage 1:16 scale dolls house, I opted to decorate it with vintage furniture pieces and accessories. 

The first pieces of furniture to arrive were the 1950's Barton dining table and chairs. They are quite cute and for the table I managed to find a vintage Lundby Breakfast set. 

Barton dining table set

Lundby breakfast set
 I also found this cute Dol Toi kitchen sink which matched with the other furniture pieces. 

Dol Toi kitchen sink
I came across some nice Barrett & Sons miniature pieces. My favorite  piece is the cooker with some pots and frying pan. 

Barrett & Sons Cooker
In the corner I added the vintage metal vacuum-cleaner. 

Barrett & Sons Vacuum-cleaner
I had this side board by Oakleaf which came with the Tudor Manor. It looked nice in the room. I added a few accessories to it. A Vintage working lamp which I still need to fix. A vintage flower pot and a Barrett & Sons metal telephone. 

Oakleaf side board with accessories
On the adjacent wall I have added an early Barton Dresser with some vintage accessories as well.

Early Barton  dresser
I still need to add a few more accessories to it. My favorite pieces are the metal Barrett & Sons metal pot and the salt and pepper. 

Barrett & Sons pot and Salt & Pepper
Finally the last piece and in my opinion the most prestige one in the whole room is the metal 1930's gas heater. Don't know much about it but it is made in Germany according to its markings.

Miniature metal gas heater


Here are few more pictures of the room.


I hope you like how I have decorated this room. I will be adding a few accessories here and there when I come across something that I really like. I am quite happy how it turned out. 

So this is all for today. Will be updating you very soon so make sure to keep tuned. 

Take Care and See You Soon.

Hugs,

Rebecca xxx