Monday 26 September 2016

The Bathroom in Rose Cottage- Making a few miniature for it.

Hello everyone,

Quite a busy week but also an exciting one! First of all hope you are all doing fine. Autumn is here and well even the weather has changed. We've had a couple or showers and now we are waiting for a storm. Tomorrow my oldest princess will start off her new scholastic year and so little Leah will keep me company for this coming week. 

Gilbert (my hubby) has been very busy working on the new property for the dolls houses. I have to be very honest the man know how to work. He is practically doing everything from electricity. pipes, gypsum boards....in short whatever is needed he is doing. I just don't know what I'll do without him. I am a very lucky lady to have him in my life. Thank you my darling Gilbert for your love and support. xxxx

I am also excited as we will be working on a new line of products which hopefully they will be out just in time for Christmas preparation. We have also started painting and decorating some miniature furniture pieces and they have been doing well. You can all visit My Miniature World Shop at etsy

The Bathroom in Rose Cottage
Today I will be sharing with you the complete Bathroom in Rose Cottage. I really like how it turned out. I have made some miniature myself for it so I guess it is always worth it.

I have made the laundry chest or hamper. I have used thick cardboard covered with cross stick fabric. I think it looks just right.

Hand made laundry chest

I have also made the two bathroom rugs using string. They remind me of what my grandma used to have. I have also made them matching the laundry chest.

Bathroom Rugs
Using a facecloth I have cut out some towels to hand on the towel rack. 

Towels
Finally I got to make some bathroom toiletries. I have made some bottles using beads,. I made a few more towels and also a roll of toilet paper. I have also filled a few of empty canisters with wool and  broken beads and the shelf looks quite full now.

Accessories for the bathroom

Bottles made out of beads

Filled canisters 
Finally I made the little curtain for the room. I tried to choose the colors to match the wall paper.

Curtain for the room.

Here are some pictures how the room looks like.


Before we end today's post it is time for a Free - Give - Away.

Free-Give-Away Miniature Readable Book
We will be giving away a Free Miniature Readable book which is called The 3 Little Kittens.

All you have to do is: 1) Be a follower of our Blog 2) Leave a comment on this post so I know who wants to take part.

Closing Date is on the 7th October 2016. The Lucky Winner will be announced shortly afterwards.

So this is all for today. Hope you have enjoyed the new bathroom. Keep tuned for the next update on Rose Cottage.

Take Care and See You Soon.

Hugs,

Rebecca xxx


Monday 19 September 2016

The Beginning of Rose Cottage

Hello everyone,

How are you all? Hope you have started your week with a smile and had a great weekend. Me? Well you know busy as ever! What is new? 

Today I just wanted to post a quick one and to let you know that the new project has started off.

Rose Cottage
Yeps Rose Cottage is being transformed. Well as I said previously, Rose Cottage is a vintage Dolls House Emporium dolls house which goes way back in the 1980's. At that time it was the smallest dolls house on the market.

I am very luck to have it. As it was pre-owned, I am not intending to change it's wall paper  and flooring as they are still in a very good state. I have decided that the ground floor room will be transformed in a kitchen living. The Second room on the 1st floor will be the main bedroom and the top room (attic) will be transformed into a bathroom.

Something that you must also note that I hate and I repeat I hate dolls houses that don't have a staircase. They don't look realistic. Well this dolls house doesn't have them. I almost thought of adding them but then again I didn't want to massacre the house to open the flooring for the stairs. Besides the rooms are slightly smaller than I hoped so my best options to add false doors at the back. This will give the illusion that behind the doors there must be some sort of staircase.

Adding the false doors at the back.

They looked good to me. So I have painted the doors white. Another thing that this dolls house didn't have was lights. Very strange. another thing which I can't stand; A dolls house without lights.


As I had no intention to peal off the flooring my best option was to make false ceilings to make the lights for the living area. For the bedroom and bathroom I used some wall lights.

As the dolls house had ceiling paper, I have realized that it had bubbles and could have been easily removed. One pull and they were out in a blink of an eye.

Removing the paper from the ceiling.
I have noticed that the mdf didn't have an undercoat of paint. Don't ask me why, because I don't know. So being very careful I did the false ceiling and added the lights to the rooms and they look great.


The Bathroom

The Bedroom

The kitchen living

So now I guess this is the start for the house. Hopefully I won't take that long as usually to decorate them.

I almost forgot....Do you remember that the house came with 2 dolls which I didn't know much about? A few friends told me what they are and I got to know that they are Vintage Dolls by Erna Meyer.
Vintage dolls by Erna Meyer

I couldn't bare that this couple didn't have at least one child. I was lucky enough to find a vintage baby doll by Erna Meyer still in it's original vintage packing.

Vintage Baby Doll


Now I guess the family is complete. I am sure that the Mrs will love it.


So this is all for today. Now I will continue decorating the house. I am really hoping to give it lots of details. I hope that I will succeed. Keep tuned for the next update on my Rose Cottage.

Take Care and see you soon.

Hugs,


Rebecca xxx


Tuesday 13 September 2016

Cup of Tea - Tutorial on Dollhouse Miniatures Magazine

Hello everyone,

Hope you are all doing fine. It has been busy in the last few days and for some reason I haven't settled in. Well I won't be settling in until I see the kids back to school once again. Lots of preparation before they are off. Dreading the moment but that is life. My young man will be starting next week and the girls will start a week after.

Before I start off I wanted to welcome a new follower to our blog Welcome Ali! Today I will be sharing with you one of my tutorials that I have made for Dollhouse Miniatures Magazine. This tutorial is featured in the latest issue 53, September/October.


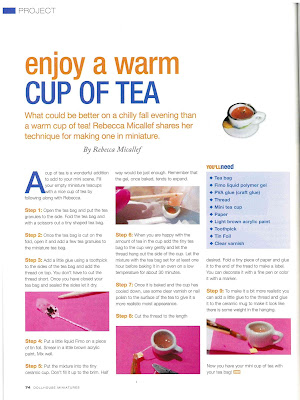
I bet a few of you might recognize this tea preparation which is set up in No 35, Miss Leah's Home. I was asked to make a tutorial how to make a tea cup with a tea bag which now is featured in Dollhouse Miniatures Magazine.


And here is the featured tutorial you can click Here to have a copy of the Featured Tutorial Enjoy a Warm cup of Tea.


I will be sharing with you in detail how to make this cup of tea

Filled cup of tea with tea bag

So You will be needing a real tea bag, some pva glue, Fimo liquid gel, a miniature ceramic cup, thread, paper and acrylic light brown acrylic paint.
Open the tea bag and keep the tea granules to a side. Fold the tea bag and with a scissors cut a tiny shaped tea bag. 


Once the tea bag is cut on the fold open it and add a few tea granules to the miniature tea bag. Don’t add lots as it will be too bulky. 

Add a little pva glue using a toothpick to the sides of the tea bag and add the thread on top.  You don’t have to cut the thread short. Once you closed your tea bag and sealed the sides let it dry.

Get a piece of tin foil and add a little fimo liquid gel to it. Smear a little brown acrylic paint. Just a tiny touch. You don’t want your tea to look too dark.  Mix well.

Add the mixture to the tiny ceramic cup. Don’t fill it up to the brim. Half way would be just enough. Remember that the gel once baked tends to expand.

When you are happy with the amount of tea in the cup add the tiny tea bag to the cup very gently and let the thread hang up by the side of the cup. Let the mixture with the tea bag set for at least one hour before baking it in an oven on a low temperature of about 30 minutes. 

Once it is baked and the cup has cooled down, use some clear varnish or nail polish to the surface of the sea to give it a more realistic moist appearance. 

Cut the thread to the length that you want. Fold a tiny piece of paper and glue it to the end of the tread to make a small label. You can decorate it with a fine pen or color it with a marker.

To make it a bit more realistic you can add a little pva glue to the thread and glue it to the ceramic mug to make it look that there is some weight in the hanging.

There you have your miniature tea with your tea bag. 


I hope you will find this useful for your dolls house miniature projects.

My Miniature World Readable Books

I am also pleased to say that My Miniature World Books on the blog has been updated were you can find all the miniature readable books available in different sections. Just click on the Title Caption below the pictures to find out more. Now we are offering them from here too Ready Made and also in Kit form. We are really excited as more books are coming up soon and for a good reason. Very soon I will be working on a Dolls House Project which will be called The Old Library. This will be part of Regent Street. 

So this is all for today. Hopefully we will start working on the beginning of Rose Cottage.

Take Care and see you real soon.

Hugs,

Rebecca xxx


Sunday 4 September 2016

End of Summer Miniature Fairy Garden

Hello Everyone,

I hope you all enjoyed your weekend. This weekend I just simply wanted to take it easy and relax. September started and by now some of you might already know that it's my worst month of the year. I don't know why it effects me so much knowing that the kids will start their new scholastic year. I guess it is just me being a mum and every minute is precious with the children. Also I wanted to welcome a new follower to the blog. Welcome Gloria Miniatures.

Today I wanted to share with you something a bit different from the normal. Yes just my miniature gardening. After all it is still a miniature.

End of Summer Miniature Fairy Garden
September always comes with a bang not only for my mood swings but even for the weather. September is the month where all hell breaks loose. Yes you wake up in the morning the sun is shining just like the rest of the Summer and all of a sudden you get one hell of a thunder and rain storm. The type of storm that you don't want especially when you are not prepared for it at all.

Any way, I have taken it upon myself that I won't worry about it when it happens just by preparing for it in the beginning of the month. I make sure that the terraces are all clean, No toys, furniture, animals are out. I also clean up my roof garden, remove most of the Summer Flowers, put away all the pots for next year and just keep the strongest of plants which in this case are the succulents. Where I live, especially so close to the sea and strong winds are inevitable, they are the best.

Today was gardening day for me. I had one extremely large pot, It is around 50 cm diameter from the opening and I was hoping that I would make some sort of fairy garden with it. So I filled it up with a mixture of soil and peat. I have used a ice cream container just for size to see if I could use some sort of garden ornament with the small plants.


I saved some of the ones I had and got some new succulents to add. There is quite a variety to choose from.


I re-potted them all in the  pot. You can see a smaller container in the center. This is to give an indication where not to place the plants.


When those were settled. I know what I had in mind but knowing my luck I wasn't going to find it in a blink of an eye. I have seen so many pretty fairy gardens with houses and pretty stuff, I just didn't know what I was going to add. An idea came to my mind......wow that's a surprise!!!! I remember that we had some sort of an old ornament in the shape of a house that we had in our old fish tank. I remember my husband, Gilbert removing it from the fish tank over a year ago because it took so much space and it didn't look nice like it used to. So I fetched out and gave it a new paint job and sealed it with varnish.


When that was dry I have placed in the center of the pot.


Still it need something more so I added some pebbles around.


Hmmm.....still not enough! I remembered that I had a pair of fairies made out of resin. Only God knows from where they came from, but I thought they would make a nice addition to the pot. I also added a pair of old toad stools that I made with polymer clay.


I was thrilled with the out come. 


I found one of these solar led lights. They are quite nice and have the right size to be placed in a pot. So I thought of adding one to the garden. After all the fairies need some light too.


They do give a nice glow.


These below two pictures were taken in the dark so you can see the light on.

So this is all for today. I hope you like my new Miniature Fairy garden. We have a new miniature tutorial coming up soon so keep tuned.

Take Care and See You Soon.

Hugs,

Rebecca xxx