Saturday 30 April 2016

Autumn Bauble - Miniature Project

Hello everyone,

Hope you are all enjoying your weekend. Another month has gone by. Time does fly. I will be quite busy for the month of May so I really hope that I will still have time for my miniatures and dolls houses. I guess I have to take it day by day and hope for the best.

Today I will be sharing with you a small micro project that I have been working on.


The Autumn Bauble
After I made the Christmas Winter Bauble I thought I would go on and make three others each will be representing the four seasons. So I got myself another kit which has an Autumn taste and colors. 


Once again the kit had lots of bits and pieces. Each time I open one of these kits I keep telling myself that it would be the last but then again I still end up getting another.

I started working on the building first.


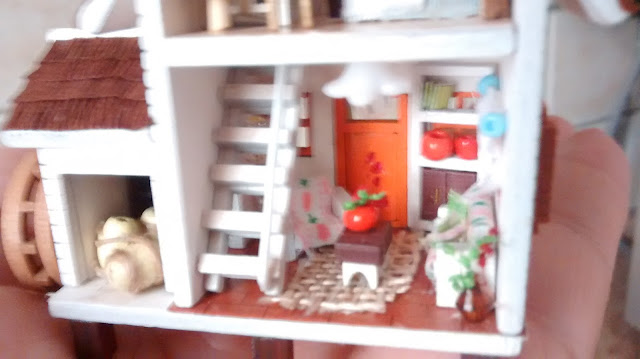
It is quite a cute house with three room,  a water mill wheel and a lovely garden. I had to tile the roofs with paper and added the little bits and pieces. It also has battery powered led lights.


Some of the furniture pieces
The furniture was so cute to build and just right for this project. I had to make tiny cushions,books, curtains and flowers pots. This house had a lot of accessories to add.


When the inside was complete it was time to decorate the house from the outside with green moss and tiny greenery.


Decorating outside the house
The house came with a base which has a small stream with bridge and front garden.

The base
Then the tricky part was to fit everything nicely in the glass bauble. This had small tiny gravel which in my opinion was much better to use than the snow. And finally the house was fitted in and everything was just right.


Just like the winter bauble the house lights up with just a tap on the glass. Here is a small video of it.


So this is all for today. I hope you have enjoyed this miniature project. 

Hopefully next time when we will meet we will be having an update on the vintage Tudor Manor so keep tuned.

See you all soon and take care.

Hugs,

Rebecca xxx


Monday 25 April 2016

The Main Bed Room in Tudor Manor

Hello Everyone,

I hope you all had a great weekend! It has been a few days since I last posted. Apart from being busy with my priorities in life as Raquel's 1st Communion is approaching fast, I was under the weather. Got myself a head cold thanks to the change in climate. Mother Nature can't seem to make up her mind if she wants Summer, Spring or even Autumn. This year she has totally forgot about Winter here in Malta. This works just fine for me. I can't complain about that at all as I hate winter.

My Tudor Manor is almost in it's final touches. I am just adding a few more accessories here and there to add more detail. So I must say that I think by the 2nd week of May it will be done.

Like a few of you know last August I had started just a little work on the Tudor Manor and the first room that I started working on was the Main Bed Room.

The Main Bed Room
The design of the bed room was made especially for me by Elf miniatures. Elizabeth and I had worked it all together and you can read all about it on an older post 1930's Bedroom for Tudor Manor. Even if the furniture was done still I needed to add more accessories and detail to make it looked more lived in.

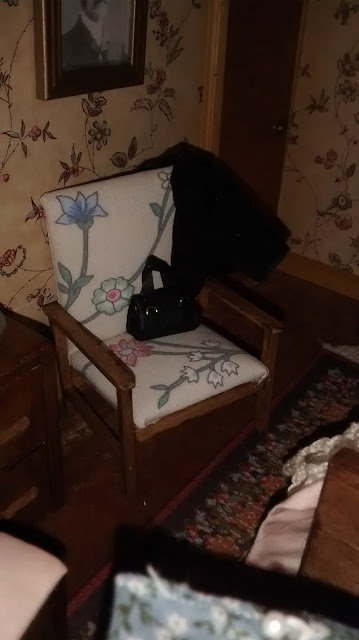
I have added an extra piece of furniture to the room which is the arm chair. The arm Chair is another kit from Jane Harrop and I have stained it to match the room. 


1930's style arm chair


The arm chair has a 1930's style and it had fitted in perfectly.

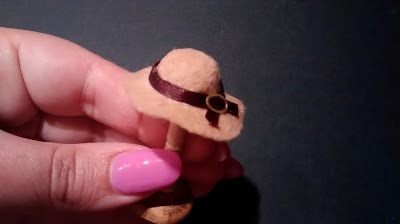
I have also tried my hand at making a 1930's style lady's hat using a piece of felt. I think for the first I did a pretty good job. I am quite pleased with it. I have placed it on the wardrobe.


1930's Style hat


On the chest of drawers apart from a hand painted Art Deco figurine and a 1930's style Frame I have also added a men's dressing table set. They were quite needy at the time.


Some how the room being quite spacious still had something missing. There was still lots of room to add more especially in the center area.

I thought it was a good idea to add an ironing board. In the period an ironing board was not only used in the wash room or in the utility room. Some would use it in the kitchen, or in the sitting room. Others would use it in a bedroom. It all depended on the space I guess or where the lady of the house would find it comfortable to use.  I decided to do mine in the bed room as I had just the right amount of space for it.


Ironing board
I have hand painted a 1930's style electrical iron to add to the scene.  Have added a basket with laundry and also managed to make a lady's shirt for it.


Mrs. Noble is quite pleased with the arrangement of the setting.


 I have added a few wall frames around and a few books in the bed side tables. I still need to add the wall lights and the curtains but the room is pretty much done.

Here are a few more photos.


Hope you like what I have done so far. I think this must be one of my favorite rooms in the house. 

So this is all for today. Keep tuned for the next update on this project. Hopefully I will get to work a bit on the finishing touches of the kitchen.

Take Care and see you soon.

Hugs,

Rebecca xxx

Tuesday 12 April 2016

Decorating The Dining Room for Tudor Manor

Hello everyone,

It's been a busy week and finally I got myself to sit down and finally post. How are you my dear friends? Are you having a great week? Apart from dolls houses I am busy with my daughter's 1st Holy Communion which is to be done next month. Time does go by. I can't believe that my son's was done 2 years ago and now it's time for my Raquel.  

But you know me I will always find time for my dolls houses. Today I will be sharing with you what I have been up to with the dining room of the vintage dolls house Tudor Manor. Before I start I also wanted to welcome a new follower of my blog brisaymar. Welcome!

The Dining Room
The dining room is set between the kitchen and the hall way on the ground floor. Like most of the rooms it is narrow but then quite deep. It also has two doors opposite each other. 


The wall paper is quite pretty and the back wall is decorated differently. I can see why it was decorated in this manner. If the 3 wall were decorated the same with the blue pattern the room would have looked very crowed and even smaller. Once again I came to the conclusion that due to space furniture had to be limited and chosen very carefully. 

I had a 1930's style glass cabinet that I was sure that it would have fitted lovely in this room. So I have placed it at the back. I have filled the cabinet with a Clarice Cliff design dinner set. Clarice Cliff  designed pottery was quite a hit in the 1930's. I also added a green tea set which also has a 1930's style. Believe it or not I remember my grandma had one similar to it and my mother in-law has inherited a whole set. They are very fine and delicate.

Cabinet with dinner and tea set


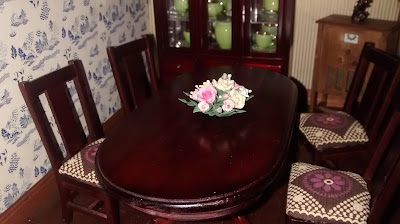
I had to be very careful in the choice of the dinner table. I couldn't go for any table so I tried my best to try and find a narrow one.  I also found some pretty dinner chairs which have the period's style and they have fitted so well.


Still the room looked bare and the problem was I couldn't add much. There was no way I could have fitted another piece of furniture. Moving the cabinet a bit to the side I have added the console radio in the corner. This is also a Jane' Harrops kit. On top I have added a hand painted with a bronze effect Art Deco figurine.

Console Radio
Still it was not enough. The walls could afford to have more. I have placed a religious painting of the Last Supper which most Christians at that time would have had one hanging right over the dinner table in the dining room. 

I have also managed to place another wall hanging cabinet which has fitted in perfectly. As there was no room for furniture I think that was ideal to add. I still need to add some appropriate miniatures to it. I am thinking of adding a collection of Toby Jugs as they were quite fashionable in the late 20's


I still need to add lighting to the room and add more accessories and details but I am quite happy how it has turned out.

Here are some more pictures of the whole room.


 Before closing the post I wanted to announce the winning follower of our free give away. We had quite a good number of participants and I want to thank you all. I have placed the names of everyone in the basket and my little Leah helped me out to draw out the name. And the winner of this miniature ceramic platter is Denise Cole. Congratulations Denise. Please send me a private message or email with your details so I can send it off to you. We will be having more give aways very soon,

Winner of platter is Denise Cole

So this is all everyone, I hope you have enjoyed it. The Tudor Manor is filling up nicely and let's just say it won't be long until we start off with another project. So keep tuned for the next update.


Take Care and see you soon.

Hugs,

Rebecca xxx