Friday, 13 July 2012

Filled Glass Jars with Polymer Clay minis

Hello everyone.


I really hope that you are enjoying your summer. Here in Malta we are having a terrible heat wave. I just hope that it gets a bit cooler by Monday.


Anyway. I have realized that one of my shelves in the living room area of  'Le Forge' was empty. I had a couple of empty glass jars so I decided to give it a try and fill them up with polymer clay minis. Well to be honest with you I am not fully happy but being the first I think I did pretty well 


I have done a jar full of sliced olives, another one with chili red peppers, another one with long green string beans and the last one with pickled eggs. I think I am just not happy with the chili red peppered jar. I had used deco jell and there where some air bubbles. I guess you learn from your own mistakes. I am pretty sure that next time I will do better. 


I have also decorated the two big jars and placed them in 'Le Forge'. I still got the results that I wanted.


Hope you like them too.


Keep tuned for more of my progress on this project.


Take Care and see you soon.


Rebecca xxxx

My first four filled glass jars with polymer clay


The Jars on the shelf


Tuesday, 10 July 2012

Le Forge - The Living Room Area

Hello everyone,

Hope you are all well. I want to thank you  for the encouraging comments. They always make me smile. I also want to welcome my new 3 followers of this blog Marisa, Faby and Debbie. 

Today I will be sharing with you some interior works that I did in the living room area of 'Le Forge'

The Living Room Area
Firstly I started with the wall papering and the flooring. I used stone effect paper for the walls and wood paper for the floor. Then I built the stove surround  and used tiled wall paper for it's insert and floor tiled paper where the stove would be standing.  I also made the little shelve for the surround.

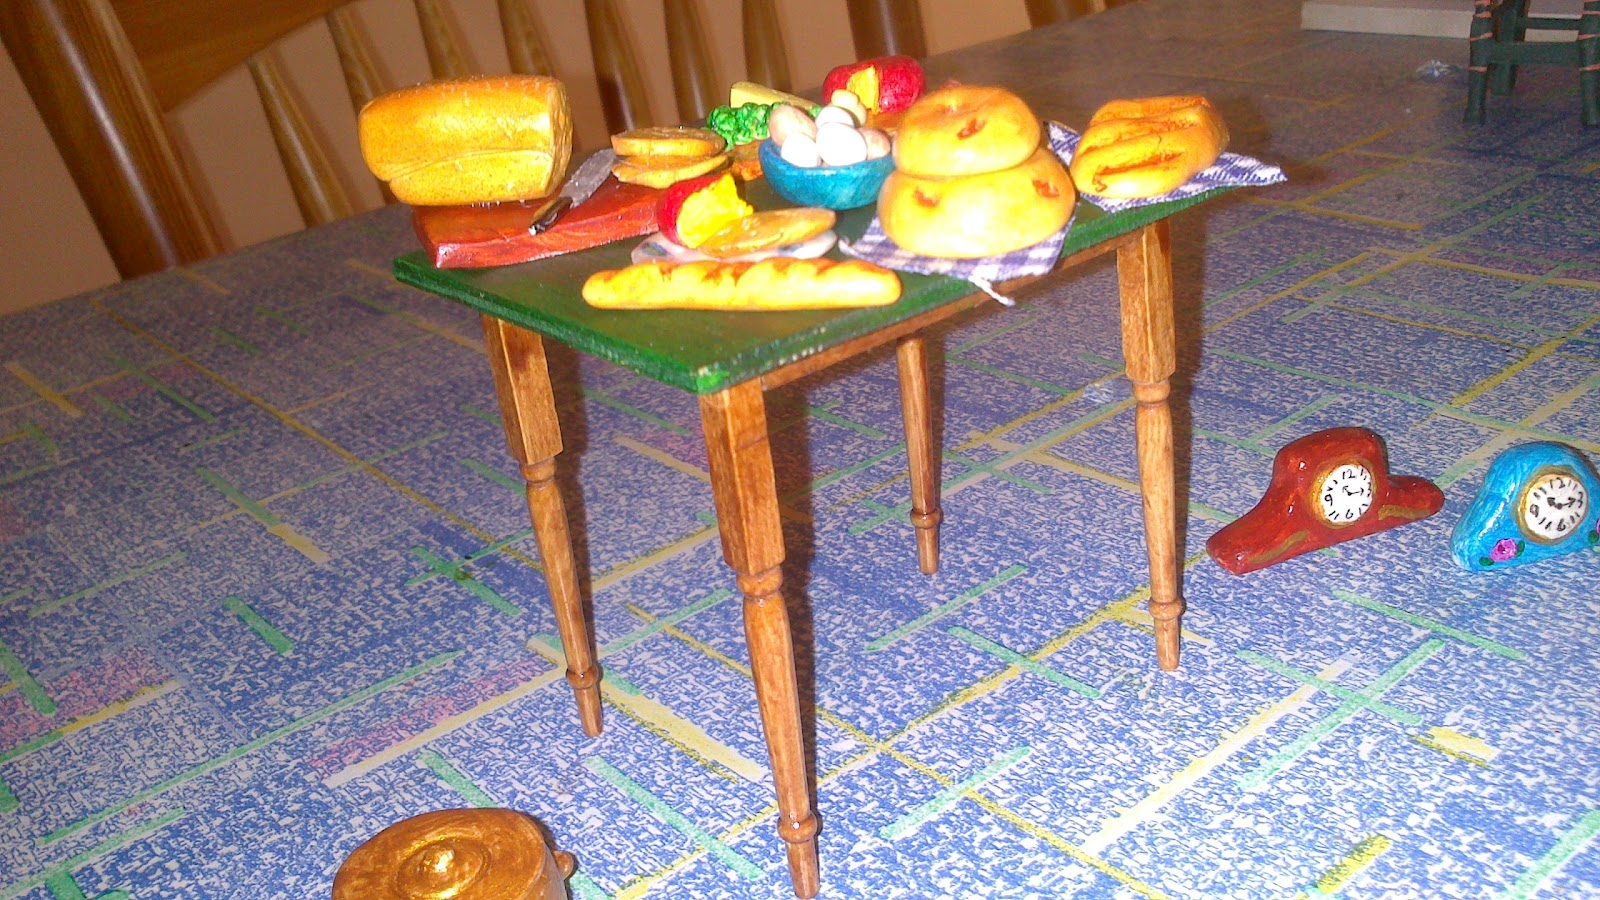
Then I did the wooden ceiling beams and ladder that leads to the sleeping quarters. I also built the small green table that is set in the middle of the room as I couldn't find one that fitted in perfectly.
Then came the fun part - decorating the room. I have fitted in all the little pieces that I made myself with polymer clay. I also added some accessories which obviously I didn't do.

I have printed a small news paper for the table and have made the dish cloth which is set on sink and the curtains for the windows.

I still have to add more accessories to the room but so far I am very happy with it. 

Here are some pictures of the setting of room. Hope you all like it.

Keep tuned as I will be sharing with you more of my progress on this project.

Take Care,

Rebecca xxx


The stove surround with shelve

The table setting

The whole room


The Curtains for the room


Thursday, 5 July 2012

Polymer Clay Minis for 'Le Forge'

Hello Everyone,


I have been working some more on the interior of 'Le Forge'. I'm really enjoying doing most of the works myself as it comes more unique and a bit more cheaper. 


Today I will be sharing with you some polymer clay minis that I have done in this past week, which will be placed in 'Le Forge'. Probably I will still be adding more. I'm really enjoying doing them. Still there is a lot of room for improvement but I'm getting there.


Well Last week I did:

  • A small bowl of eggs
  • Three loaves of bread
  • A chopping board with three different pieces of cheese and grapes
  • A bar of sop with tray
  • A round chopping board with sausages
  • 2 plates which I have hand painted
  • 2 mantelpiece clocks
  • A chopping board with a loaf of bread, bread knife and 2 slices of bread.
  • A plate with a piece of cheese and one slice of bread
  • A cooking pot with lid.


I also did the small wooden table which will be fitted in 'Le Forge'


Some of the complete polymer clay minis for Le Forge

The Food Display

The Mantelpiece Clocks

The Cooking Pot, Two plates and bar of soap on tray

The wooden table that was hand crafted by me for 'Le Forge'


Today I completed some last pieces which are:

  • A pan
  • A mixing bowl
  • A cup of coffee
  • A Vase
The cup of coffee and the vase where both hand painted by me. The liquid for the coffee was made with colored deco jell. I think these are my favorite.

The Pan, Vase, Cup of Coffee and Mixing Bowl which where completed Today


Next week probably you will see them all displayed in 'Le Forge. So make sure you keep tuned.

Take Care and See You Soon.

Hugs,

Rebecca xxx


Monday, 2 July 2012

My First Patch Work Quilt

Hello Friends,


Hope you are all enjoying your summer. This weekend I didn't have a lot of energy to do anything with this unbearable heat. So today I am going to be very brief but I wanted to share with you my first patch work quilt for my miniature bed which will placed in the sleeping area of 'Le Forge'. I love patch work even for my own house. I wish I new how to work out the real thing. 


I had some unused small patterned that would have fitted perfectly for a 1:12 scale. I have cut some 1 inch squares and sewn them up together. I am very pleased with the out come as I didn't have any idea what I was to do.  I also made the pillow and the pillow case. They fitted the bed perfectly and made the room look cosy too.


So here it is. I hope you all like it. 


I will be with you during the week as hopefully I will be doing some more accessories for 'Le Forge'.


Keep tuned.


Take Care and See you.


Rebecca xxx

My First Patch Work Quilt


The Pillow and Pillow Case. 

The Bed with the new patch work quilt in 'Le Forge'

Wednesday, 27 June 2012

Le Forge - The Stair Case and Water Closet

Hello everyone,

Firstly I want to thank everyone for your wonderful comments and I also want to welcome my newest follower Drora. It is very encouraging. 

Today I wanted to share with you some more of my work on the outside of  'Le Forge'  that I managed to complete in the past week. It hasn't been much, but for me it's quite an achievement. In Malta it has really been hot and my pregnancy is taking it's toll......so when I complete something even if it is something as small as this, it is like I made a giant's step.

As you all know this kit came without a stair case or doors and so I had to open one of the  second floor walls to add a door and also a leading outdoor staircase. So I have manged to complete most of the stair case. Still I need to fit a hand rail and the front door step. I have also fitted in the front door lantern which eventually will be lit.

Underneath the stair case there was enough room to make a water closet. I have added a small window and door and also fitted in an outdoor lantern.

For the water closet I have fitted in a butler's sink and also an old fashioned loo which I have made. I'm quite please with the out come. I still need to add some accessories to it and I still have to dirty a little this room. 

So this is how it's looking so far. Hope you like it.

Keep tuned as I'm still working on it and I still have much to share.

Take Care and see you soon.

Regards,

Rebecca xxx

Outside  Le Forge

The New Finished outside Staircase 

Matching doors and lanterns

Outside the Water Closet

Inside the Water Closet and the handmade loo

Inside the Water Closet and I also added a lace curtain to the small window

The Loo and Butler's sink inside the Water Closet. 

Friday, 22 June 2012

Le Forge - The Blacksmith's Forge

Hello everyone,

Hope you are all well. This week I have made some more progress on my blacksmith's forge. It hasn't been easy to complete especially when I never have been in one myself.

Unfortunately you don't find any miniatures  fit for a forge so I had to do most of it myself. Piece by piece, I manged to finish it off.  Probably I would still be adding more accessories  to it but the headache of it all is over. Obviously I still need to work on  the whole property.

Firstly I started building the smoke hood and the heart which where both made out of wood. I have added a lit fire basket to the heart so it would light up eventually when all the lights have been added. I also added small pieces of real coal around the fire basket. Then I stared working on the bellows. The bellows are made out of wood and a piece of linen instead of leather. The linen was pleated and painted to make it look a lot like leather. Then I did the water tank which was made out of wood and painted in silver paint.  


After those where ready, I started working on the work bench which I made out of wood. I also made a forge clamp to attach to the work bench. I made the clamp out of polymer clay and painted it. I am actually very pleased with the outcome of it.  I also added a shelve over the work bench which I did too.  


Then I added some more accessories to the room apart from the ready made tools, I made the coal sack, the metal sheets are made out of cardboard and the metal rods/spokes are made out out cut out toothpicks. I also added the ceiling beams to the room.


Then the fun part came with black acrylic paint and a paint brush I dirtied the whole room, tools and accessories to make it look like suet.


I'm quite pleased with the out come . I hope you all like it. I still can't believe it that I have finished this room. 


Here are some photos of the blacksmith's forge.


Please keep tuned as I continue with this project very soon.


Wishing you all a happy weekend.


Take Care.


Rebecca xxxx

The smoke hood,  and heart
The Water tank and bellows

The heart, bellows and water tank.                                                               
The Work bench
The wooden shelve

The Forge's Clamp


The Blacksmith's Forge
A closer look.


Monday, 18 June 2012

Le Forge - My New Project!

Hello everyone,

Hope you are well! In Malta is getting hotter and even doe Summer hasn't started, our lovely beaches are already being filled with people and children to swim in the sea.

Today I will be sharing with you a new project that I have been working on for these couple of months. It is a Dolls House Emporium Kit which was originally called The Gate House. The Gate house is a three story property that comes with a front and back arch leading to the first room. Then there are two other rooms on top of each other with lovely french windows. Unfortunately there where no stair cases which lead from one room to another. I guess that's the fun of this hobby that you can alter your house to your own likes and imagination. 

I had purchased this property as it seems that it will be discontinued and I didn't want to lose my chance of not owning this lovely building. I had a lot of difficulty deciding what to do with it, as the only picture that I saw fit for it was the one picture I desperately wanted to run away from - A miniature blacksmith's forge. The more I looked at this property the more I imagined it. 

The 1st and 2nd floor
 The first progress on this property was the staircases and doors. The first floor is going to be turned into the forge with a back gate leading to a garden. Then I will be adding an outdoor stair case which leads to the second floor where you will find the blacksmith's living quarters. Underneath this staircase there will be enough room for a water closet. 

The door leading to the 2nd floor which  eventually
will have an outdoor  staircase.
Then I had to make an opening in the living room's ceiling  where I have made a ladder to lead to the third floor. The room was too small to make a staircase. The third floor will be turned into the sleeping quarters. 

I had found a french arched door which I have put in for the front arch. This door will lead to the forge. 

The 2nd floor which has the outside door and the ladder leading to the bedroom..

After designing it all, my father helped me by making the back garden gate which is made out of lead wire. It fitted in perfectly and I am really happy with it. I have also stared papering the walls, roof and floors. Have painted most of the doors and windows. 

The back garden Gate which my father has made. 

The Forge painted and decorated from the outside.
I have also designed the sign for this property with the computer. I have decided to call it 'Le Forge' as the property itself has a French style. 

The Designed Sign that I made for the forge..
Now I have started working on the interior of the forge. So far I am managing as all the forge pieces are being handmade by me. They have been quite a headache but now I'm almost at the finishing touches.

Keep tuned as I will be sharing with you more of my progress on this property very soon.

Take Care and see you.

Rebecca xxx